Sunday, 27 August 2017

Photoshoot

A few months ago I did my first studio photoshoot. It was with photographer Paul Furness, a student at CIT, who was doing a fashion shoot for an assignment. He had a particular interested in featuring steampunk style and contacted my sewing teacher looking for potential models or people with steampunk costumes.

I don't do steampunk proper but I have made enough clothes that have a vaguely gothy/Victoriana style to make do. He selected some outfits from my blog (yay for online portfolios) to use for the shoot.

Here are some of the finished shots.
Photography by Paul Furness
Make-up by Simone Turnbull
Outfits and modelling by Tia-Rayel
The images turned out very nicely. It was really cool working in a studio with fancy technology. Paul knew the kind of images he wanted to take so directed me on how to stand and look. I found this very helpful as knowing how to pose is something I struggle with. Also working on the shoot was makeup artist Simone Turnbull, who did a beautiful job. In the last few years I've put a lot of effort into improving my sewing technique - now it's time to focus on some of the costuming-adjacent skills like makeup and posing.
This photo taken by my mum.

Saturday, 19 August 2017

Gamma.Con 2017

I attended Gamma.Con again this year, this time with my friend, Lady B. The event was several weeks earlier than last year – well and truly in winter. Saturday began with a half hour wait outside queuing for admission, during which it briefly snowed. I wore my Misery costume again and so had layers, long sleeves and gloves, but poor Lady B's Belle costume didn't provide much protection from the weather. The best protection from the weather is, of course, wearing something you want to be wearing so it wasn't as cold as it could have been.
Inside the temperature was much more agreeable. Belle was very popular, with young children especially, so we were often stopped for photos and occasionally hugs. I even managed to find someone who remembered Ruby Gloom and was excited to see Misery and that was quite nice.
On the second day Lady B went as MCU Scarlet Witch and I dressed as Elizabeth from Bioshock Infinite. I dyed my hair to go with the costume. While the hairstyle looks simple, it took a few practices and an extra pair of hands to get the hair to have body in the right places.
I made the bow the night before, of course.
Because I was entering the cosplay competition I wanted to do character makeup to go with the costume. I don't normally wear makeup irl so I contacted Simone Turnbull, a makeup artist I met at a photoshoot a few months ago, and asked if she would give me a lesson. Her training and product advice proved very useful and after a few night’s practicing I managed to get an outcome that I was very happy with. I think it adds a lot to the overall look (even if it means being paranoid about touching my face all day).
The costume is worn over my Edwardian corset which, I realised in the car on the way there, I had never actually worn for any length of time before – only for photo sessions and fittings. Turns out it’s very comfortable. I also made a new chemise which was an opportunity to do lace insertion again (yay!) and more tucks (less yay).
From Laughing Moon pattern #100.
Also very comfortable were the shoes (Ellie Shoes: Amelia) which I bought, from eBay, for the occasion, although I will never quite forgive them for having zips. I mean they lace up anyway!
I won the sewing category of the cosplay competition. The prize was a voucher for a sewing machine. That's two sewing machines I've won in two years – not a particularly useful habit to get into. However, the sponsoring store, Cardif Collective, has said they are willing to be flexible about the prize.
I struggled for a bit to work out what kind of handbag to wear with this outfit since Elizabeth doesn't have one. Then I remembered that she's a bookish character that we first meet in a library. So, a few days before Gamma.Con I went looking for a book that I could cut out and modify to serve as a handbag. Or a fake-book container that could be adapted. The first shop I went into had something more perfect than I imagined I could find. Not only did they have light-weight magnetic closing book-shaped boxes, they had one that was a scrapbook about Paris – the place Elizabeth dreams of going. All I had to do was glue a zipped pouch inside.
With the book I never had to put my purse down for photos and it gave me something to pose with. I appreciated this a lot as I often feel awkward posing for photos and don't know what to do with my limbs.
Photo by Tony & Dave Cosplay Photographers.
The event itself was small but good. There were more cosplay-focused panels than last year and I found the leather working one (given by A. K. Wirru) particularly useful. I will definitely be embossing leather on my costume for next year.

Monday, 31 July 2017

Waterwear

The performance wear (leotard) sewing class I did last year was very valuable. The dress pattern I developed as a result of it is one of my favourites. But the (nicely fitted) swimming togs I actually made during the course are not quite my thing. So with a beach holiday on the horizon I took out the pattern again to make some togs that were a bit more me.
I am loving the halter neckline that is around at the moment. So I used the pattern off a dress in my wardrobe for the neckline and combined it with the leotard body pattern from the performance class. I also put a tear-drop shaped cutout in the back – because who puts a back in swimming togs? (The shape ended up being more round once it was stretched out for wearing but it still looks fine.)
I find one piece leotards to be uncomfortable and inconvenient so I made it as a two-piece with what the internet tells me is called a 'tankini'.

The big learning exercise for this project was putting in a built-in bra – method courtesy of google and guesswork. The lining fabric (this can be the same as the main fabric but I didn't have enough left) is cut using the same pattern as the outside then shaped marginally thinner towards the bottom edge that will sit just under the bust. This is sewn to an elastic band. I sewed the whole thing up at this point and worked out the cup placement while wearing it. Sewing the cups in afterwards was awkward, so I suspect there is a better way, but I wasn't sure how to do the placement without being able to reproduce the stretch that would be in the fabric when the garment is worn.
The cups are chlorine resistant but I couldn't find any proper swimsuit lining so I just used stretch lining. Given that I've been swimming once in the last ten years I'm not really expecting these to suffer from over-wear. The main fabric is chlorine-proof, left over from the performance-wear course. I looked for some woven chlorine-resistant fabric to make board shorts but I couldn't find a shop that stocked it. Some shops didn't even know what it was.
I was happy with how the swimsuit turned out. As with the dress I made with the same neckline, the neck band itself is not quite right but not wrong enough to be a problem. Unfortunately the weekend at the coast turned out to be overcast and not enticing for swimming. I'll have to hope that another swimming opportunity arises in the next decade so I can try them out.

Thursday, 13 July 2017

Halt! Who goes wear?

There's a particular kind of halter neckline that is 'in' at the moment that I really like. (Someone tell me if there's a more specific name for it – 'sleeveless raglan' just confuses people.) It's popularity, however, does not appear to have crossed into the commercial patternmaking world (leastways, not since the 70s. Again, if you know something please tell me.)

I've bought a few dresses and tops in this style but not as many as I would like. Then I found some lovely red and black paisley chiffon that I thought would work well for one. I gave up looking for a pattern and pulled a dress out of my wardrobe and took a pattern from it.
Side note: I bought this dress in New Zealand in the couple of hours we had to kill before catching the plane home. New Zealand had a completely different set of dress shops from what we have in Australia which took me by surprise. This puts me in the position of having my most favourite clothing chain closed down and my second most favourite is in another country.

Really, most of the pattern is pretty straight forward. The only difficulty comes from the neck band. I don't think I was able to get the shape quite right by tracing an already made up dress but it will do. The finished product does feel a little tight at the front while sitting a little too loose at the back, but I'm not sure how to change that.
Before jumping in with my nice (and expensive) chiffon I decided to make a mock-up from something cheap but with the intention of being able to wear it too. I found the perfect fabric on the Spotlight sale table. It's awful! So synthetic it feels like plastic and it has a camouflage print with gold specks so it's all shiny. I was very pleased with it – and only $3 a metre.
The dress was cut and sewed quite quickly. I think something went wrong when I was making the skirt patterns as I ended up with one front, two side fronts, two side backs and two backs but the front and sides were enough to get around me. I wondered if I had just traced a side panel twice but the original dress definitely has all those panels. Still, after leaving out the back panels I've got a dress that fits and that's what matters.

Wednesday, 21 June 2017

1830s behind the scenes

I made a corded petticoat to go with my 1830s dress. The petticoat is made from 3 widths of fabric giving it a 3metre circumference. This is possibly more than it needs to be; it does rather fold in on itself.
I cut each piece a lot longer than I wanted the skirt to be and folded the excess under to hold the cording. I sewed the cords around in a spiral. The first cord I used was my trusty, neverending roll of string that I usually use for piping. Unfortunately it turned out to be not stiff enough to hold out a skirt and because it was thin it needed many, many rows that were tedious to do. I decided to get proper piping cord (and made the poor girl at Lincraft measure out 30 metres of it). I worked out the arrangement of rows based on the length of cord. These rows went in much faster and hold the skirt out very nicely.
I used a length of petersham ribbon for the waistband and it closes with two sets of tapes.
The 1830s dress is also worn with my late regency long stays. I have adapted them since last Jafa with hip gussets and a busk. The stays are much more comfortable now.
I curled my fringe with a new method of curling – using straws. You wrap your hair around the straw, fold the straw over and use a bobby pin to hold both ends of the straw together. It worked marvellously. The straw just slides out so the ringlet is not disturbed. I also used a styling mousse when setting the curl, another thing I discovered recently.

Tuesday, 13 June 2017

Ahem, a hem

The skirt of my 1830s dress is made from 4 widths of fabric with double inverted pleats at the front and cartridge pleats around the back. I pleated the skirt on to a tape (by hand) and then sewed the tape into the bodice (also by hand).
I found this webpage particularly useful as it showed an 1830s dress completely inside out which is something I’d had trouble finding. Following the 'Hem from the Waist' method it describes, I hemmed the skirt while it was still separate from the bodice.

The hem of the skirt is quite deep so I did the whip stitching with the skirt lying flat on the table to ensure the fold stay lined up where it was meant to. The hemming took a few days and was not the most comfortable thing to do.
Once the skirt piece was hemmed, the waist seam was pinned to the bodice while I was wearing it, ensuring that it was the correct length from the floor all round. I found this to be an easier way to get an even length on the skirt than taking up the hem after the skirt is attached to the bodice (although still suspiciously unscientific).
The base of the hem has a strip of wadding sewn inside it to hold the skirt out. The dress is worn over a corded petticoat.
I finished the dress and petticoat four days out from the festival (probably a personal best) which gave me just enough time to make something else. All in all this dress took a month to make. I was working full time but sewed pretty much constantly when I wasn't at work, starting at 6 o'clock in the morning.
My mum did my hair in a very nice, simplistic, 30s style. Since I didn't have time to make a bonnet I wore the Polish Casquette I made last Jafa which was trimmed in exactly the right colours.
More about the Chemise a la reine here
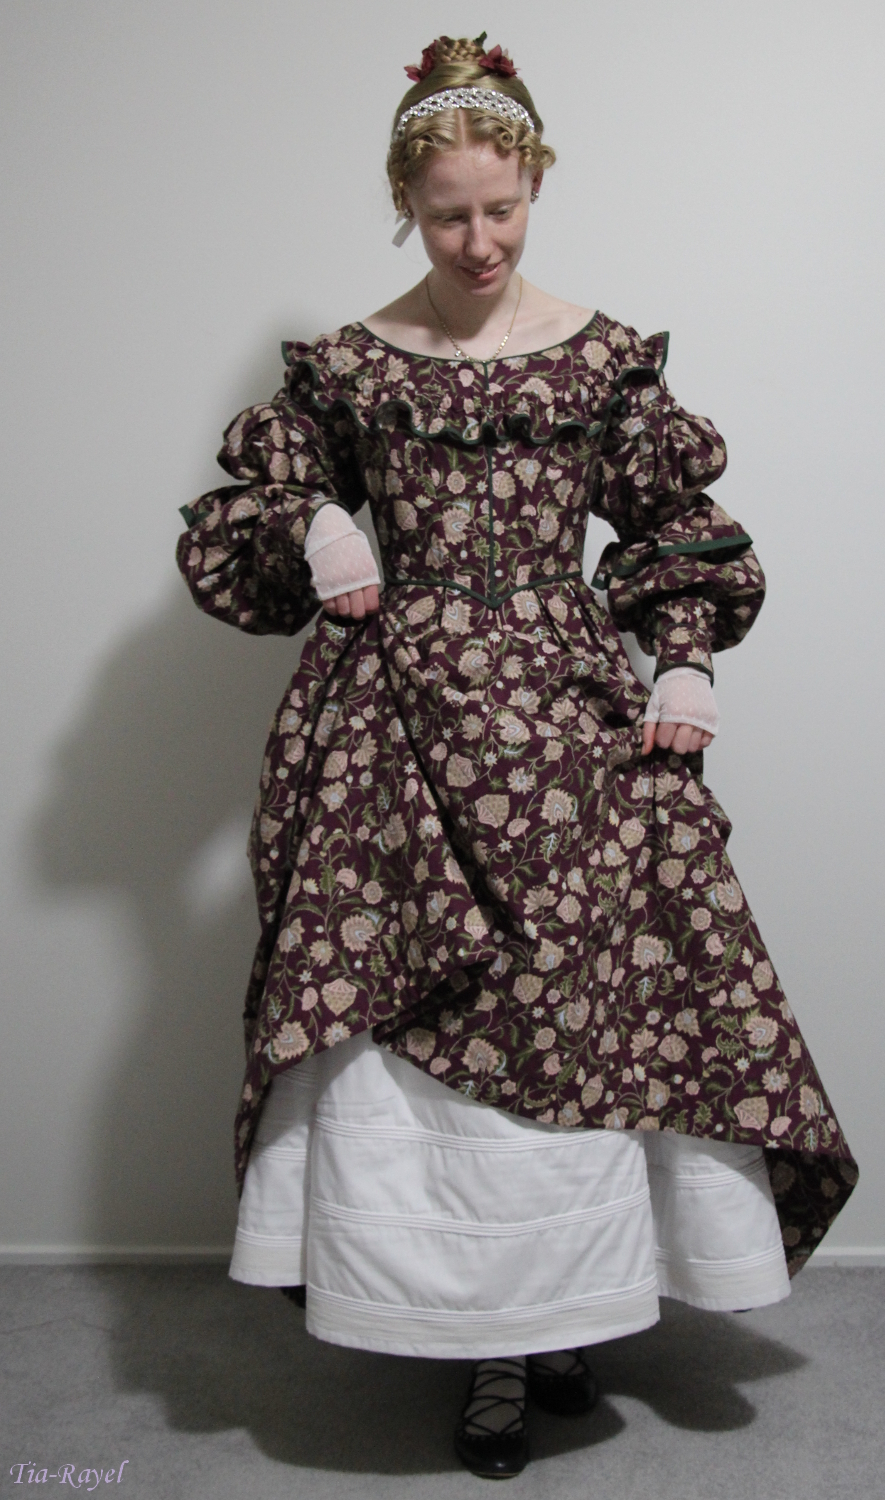
I am so, so happy with this dress. I think of everything I've made this is the one I have most enjoyed wearing. It feels lovely – the skirt swooshes so nicely when I move. Looking at 1830s necklines I had always thought I would never be able to wear them – I have shoulders that things just fall off – but now that I'm able to do pattern adjustments properly (square shoulder & small bust adjustments in this case) I was able to make it fit in a way that is comfortable and secure and looks good – and I want to make lots more necklines like it.
I am very pleased with the finish quality of the outfit too. The insides are neat, the fit is good, my historical and general sewing techniques are so much better than they used to be and I am just all-round happy with this. I think it's my favourite costume that I've made.
Photo by Stephen Shaw.

Sunday, 28 May 2017

Piping and ruffles

After the sleeves, putting together the rest of an 1830s gown seemed simple. The bodice came together pretty much over a weekend. Every piece is flat lined. All the seams are piped on the outside and finished with Hong Kong binding on the inside. I tried to follow the correct historical construction as much as I could. I found Koshka-the-Cat's series on an extant bodice helpful when choosing techniques.
I piped each bodice front and then put another row of piping around the neck after the fronts were together. Getting the angle of the front-to-neckline corner on both fronts even was painful and required repeated unpicking.
I got most of the machine sewing done on the bodice on the Saturday and that left Sunday for handsewing – I sewed early in the morning, during the sermon at church, through my Dungeons and Dragons game in the afternoon, and into the evening when I got home. It felt like it was done very quickly but there was actually a significant lot of sewing time there. I whipstitched down the piping edge (neck) and the binding (waist). At least, I think it's whipstitch – it doesn't look exactly like other examples. For the boning channels I turned over the centre front seam allowances and the bust darts (as shown on this site). I used cable ties for boning and handstitched the channel seams over the cable ties so as to make sure the channels were wide enough.

The bodice does up with hooks and eyes. The top and bottom hook are closer the edge than the rest as was often done at the time. Having the hooks and eyes arranged this way made the closure feel a lot more secure than I usually find with hooks and eyes.
I decided I didn't like the diagonal decorations on the original bodice. So instead I used a ruffle based on a dress in the Victoria & Albert museum.
Original decoration.
Inspiration decoration.
My decoration.

I gathered the ruffle over a tape then handsewed it to the bodice.
I think it turned out rather nice.