Wednesday, 28 January 2026
2025 Review
I spent ten weeks creating an outfit based on a Kinuko Y. Craft painting, with accompanying jewellery. This won overall champion of sewing at the Canberra Show.Then I modified the underdress pattern to make a shorter summer dress.I duplicated a purchased dress; adjusting the pattern to be a bit more me shaped.I made two new corsets. I fear the quest to create the ideal pattern for me may be never-ending, but it's a lot closer than it used to be.I used my contour pants pattern to make some pyjamas.The year finished with making a butterfly window hanging as a Christmas gift for a friend's 6-month-old. I satin-stitched a thin satin onto a remnant of curtain fabric, then cut away the curtain from behind the image so the light would shine through.
Tuesday, 16 September 2025
Hubris Rewarded
My first thought when making this outfit was that it was time to go back and prove to the Canberra Show that, even though I hadn't been around for a while, I could waltz back and take Champion of Sewing any time I felt like it. Which might be just slightly overconfident, but then I did win, so turns out I was right. Though I must say, the competition this year so strong that I might have even coped with a second place.Flippantly deciding on such a goal forced me to always do everything the best I could and cut no corners. Creating this outfit was very much an exercise in using all the skills and techniques I've learned over many years. I put a lot of thought into selecting the appropriate seam finishes and interfacing, and hand-stitching as much as possible.
Come on a tour.
Underdress
The underdress is nearly all French seams and it has Hong Kong binding where the neckline is folded over. I used clear elastic as the elastic channel is see-through.
My bodice fabric was pre-decorated, so step one was to remove the bobbles in the seam allowance area. I used the smash-it-with-a-hammer method for the ones that were particularly difficult but that tended to damage the fabric, so most of the removal was done by very careful pliering.
![]() |
| You have to squish the silver bit slightly before you can pull them apart. |
![]() |
| Look at that seam matching. |
The jacket is pretty simple, compared to the rest of the outfit. It has French seams and a sew-in interfaced waistband. On this and the overdress I decided to finish the lacing ends with beads. Overdress
I cannot stress enough that everything I have talked about so far is not visible while wearing the outfit. I was having great time being unnecessarily extravagant.The foundation of the overdress is a corset attached to dress along the top and back. The top edge is bound with the matte side of the underdress fabric and hand beaded with a row of moonstones. The split and hem are also bound. All the binding was finished by hand to the accompaniment of the BBC Narnia series. My whipstitch has really sped up over this project. The beading along the hem is a combination of moonstone and lava beads (I think that means pumice).There's a bit of infrastructure inside the skirt – somewhere to hook the skirt up to so it drapes nicely and somewhere to loop the lacing cord ends so they don't trip me when they are pulled tight for closure (it really does need to be that long).
I sewed in rouleaux strips for lacing and made a modesty panel with some boning along the top to ensure it sits straight. The lacing is pink because range of purple ribbon at Spotlight is sorely wanting.Accessories
To go with the outfit I made a moonstone and gold chain headpiece, a belt and bead-tasselled loop to tie it together. The bead medallions are made according to this tutorial. I had so much fun making them that I kept going, using up a chunk of the bead stash to make little gifts.The arm cuffs are 2 layers of satin and the slashes are completely hand-edged with teeny-tiny stitches. And finally, I must express a heartfelt thanks to the local Noni B for timing its liquidation sale for when I was looking for a display form. The Canberra Show no longer makes any available and I could not find a dress form small enough to fit my dress over its shoulders. Now I own [and have to find somewhere to keep] my very own store mannequin with removable arms.
![]() |
| In the Forests of Serre by Kinuko Y. Craft. |
Saturday, 24 May 2025
The Fairy Tailor
![]() |
| I promise the purples match, the camera just doesn’t like them. |
Astute readers may notice something different about this fabric selection. After looking at my pile of fabrics all week I started thinking that the grey was really bringing the purples down so I replaced it with a spring green. I discovered the purple satin I had was too much not enough, even to piece, so I bought a nearly identical replacement. Being untextured, it's not quite as nice but it drapes well and I have enough for all the binding too. The bobbly ombre fabric is for the underdress bodice.
On to Patternmaking
Underdress
The underdress pattern turned out pretty much right on the first try. I added width to the skirt pieces to allow for pleats and raised the waist. For the bodice I used the pattern’s armscyes on some rectangles. I still made multiple mock-up bodices, but that was to figure out the order in which to do things. There were so many elements to consider - the bodice is partially lined and partially gathered, has raglan off-shoulder sleeves, an unbroken elastic channel and a side zip, and is (mostly) constructed using French seams. Even so, I got partway through sewing the real one only to find my plan wasn't going to work and had to go back a few steps.
The final sewing order is:
- Darts
- Gathers
- Side seams
- Sleeves
- Lining attached at the neck
- Bind the neckline
- Elastic channel
- Waist seam
- Sleeve elastic
The finishing at the zip-side underarm is not ideal, but I couldn’t figure out anything better. I found myself comfortably wearing the mock-up around the house while sewing so have earmarked this pattern to make more of in the future, but the zip will be in the back.
JacketThe jacket is little more than one sleeve and a side front and back. I lengthened the sleeve from McCalls M4378 and extended the centre pieces to join a waistband, with a pleat in the front. This worked fine on the mock-up but was rather more fiddly with the light, maybe crepe, fabric I actually used.
Overdress
My plan for the overdress was to start with a corset which would flare out into a full skirt. It has to flare because I consider waist seams an abomination. I started by cutting down my already heavily modified corset pattern to underbust and spread it out a bit to go over the hips. Then I cut out those pieces with lots of fabric on the bottom, sewing up the corset part and cut down the excess until it made the skirt shape I wanted.
![]() |
| How it started |
![]() |
| How it's going. The bulk of the skirt is in the side. |
Other than the waist issue, this was one of the smoothest pattern-making experiences I've had which was a great relief since I had 10 weeks to go from Idea to Display. The mock-up looks pretty good itself.
Friday, 17 January 2025
Primavera
Has anyone else got an artist whose work you love so much it results in Bad Decisions? For me it's Kinuko Y. Craft. The first bad decision was finishing a book that was really not very good because of her gorgeous cover art; the second was starting to read the sequel. Third, I paid an exorbitant amount of postage to have an expensive-in-its-own-right book of her art shipped to Australia. And lastly, or rather, most recently, I decided I had to make one of the dresses I saw in said artbook. While I am supposed to be finishing up writing an album.
By coincidence, the theme for the Canberra Show craft competition this year is Myths and Legends, giving me some justification and a two-month deadline.
I have taken a break from looking through the book because it was making me crazy. Got to finish this dress first.
Google informs me that this dress is from the cover art of In the Forests of Serre by Patricia A. McKillip which I have not read or heard of in any other context. I have no idea if this character is actually a fairy, but that's what I thought of when looking at it, so I am making a fairy dress. I am also working in a very different colour pallet that feels more me.
![]() |
| Maybe this could be another bad decision. Or. Perchance. A good one. |
Patterns I am drawing from:
- Kwik Sew 2102
- Simplicity 6746
- McCalls M4861 as adapted for my Tia Dalma costume
- McCalls M4378 from which I previously made the cape for a Barbie party
- My self-drafted cuff pattern from my ice goth outfit
After picking out the brocade I was pretty sure I had some perfect stash fabrics to go with it. For the jacket I am using a heavy silver satin I'm pretty sure I got from a curtain shop. While it doesn't match the rose gold threads in the brocade, it shares a reddish undertone so they coordinate well. I was slightly concerned I had misremembered after pulling out 2 dark purple satins that didn't match at all but then I found the one I was looking for. I think it came from a warehouse in Redcliffe. I have 3m, so this one's going to be tight. I might end up having to piece some of it. The brown and beige are for linings. The sheer fabric will need to be purchased (wish me luck!) I'm thinking pale pink.
![]() |
Sunday, 24 July 2016
Pictures!
Monday, 20 June 2016
Journey into Construction
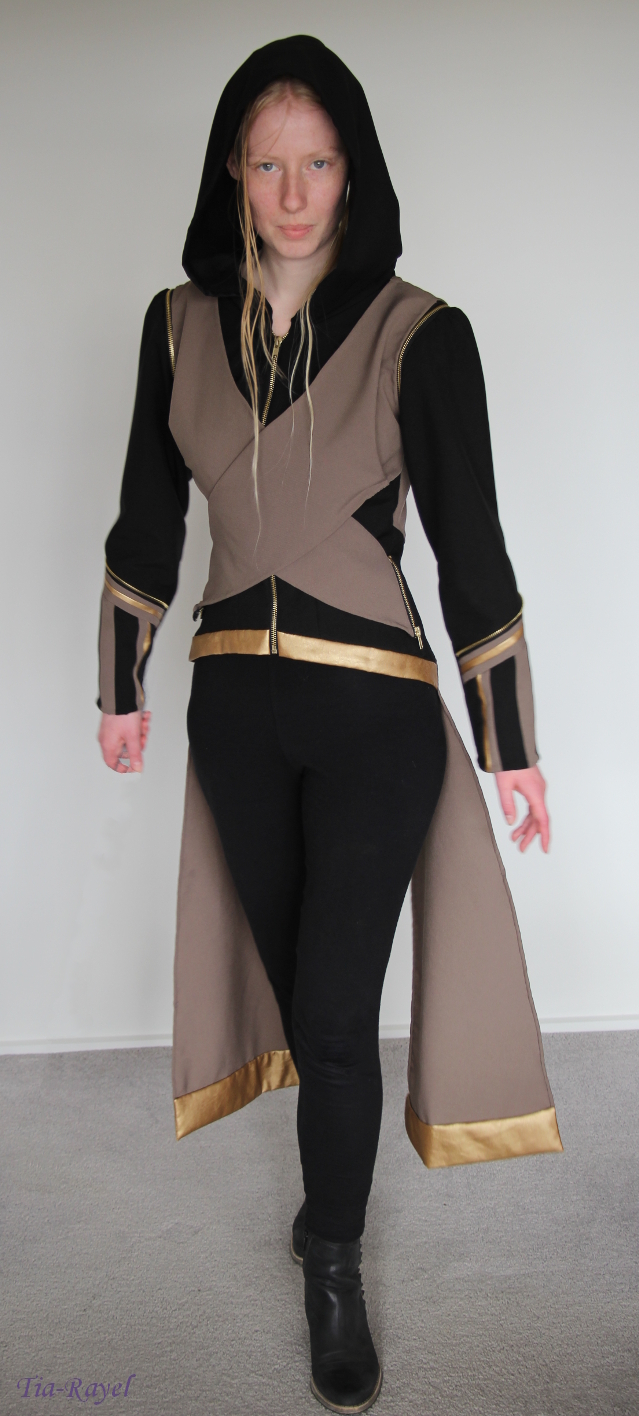
The pattern for my Asgardian outfit is based on McCall’s 3129 for the body. The grey swathes were draped. I hemmed them by hand and then sewed them to the body by hand because I didn’t think machine sewing would look nice or allow me the control I wanted over placement.
The back swathes are trimmed with gold faux leather. As well as being decorative this weights the swathes so they move nicely.
Because the faux leather doesn’t heal pinholes the way fabric does, I held it in place for sewing with bobby pins.
What I hadn’t thought of in my design (because drawn fabric will sit however you want it to) was how to make the front swathes fitting. At first I tried darts and, while they worked on the muslin, the real thing didn’t take them so well. It turned out a pleat worked just fine.
The swathes are sewn into the side and shoulder seams but not the sleevehole because I wanted to have a layered effect as is often found in Asgardian clothes.
I copied the construction of my hood from Sif’s in Thor and it turned out to be much simpler than other hoods I have made before. You start with a rectangle and put in two pleats at the centre back.
To put the outfit on, the two front swathes unzip at the side seams.
I had trouble finding the zips for this outfit because I needed jacket zips with metal teeth, with the slide the same colour as the teeth, and the colour had to look gold. Turns out zips with gold teeth but a silver slide are a thing?? Eventually I found some that were the way I wanted. They only came in various lengths of Way Too Long but that was alright because I could cut them to length and I needed enough to make trim as well.
The sleeves are attached to the outfit by functional zips. The zip ends overlap at the back.
The shape of the sleeve was largely determined by how they zip fitted in the armhole, which actually took a lot of hassle out of trying to make the sleeve pattern fit just so.
To make the patchwork sections of the sleeve, I stitched together the design I wanted into a rectangle and then cut out the shape I wanted for the lower part of the sleeve.
I sewed the upper and lower sections together and put the zip trim over the top.
The vambraces have a strip of black stretch fabric on the inside instead of a closure. This makes them easy to get on and off, and even though it looks a bit weird bit to me, it is not inconsistent with Asgardian styles.
Photos of the finished outfit are here.
Movie images belong to Marvel Studios.