The performance wear (leotard) sewing class I did last year was very valuable. The dress pattern I developed as a result of it is one of my favourites. But the (nicely fitted) swimming togs I actually made during the course are not quite my thing. So with a beach holiday on the horizon I took out the pattern again to make some togs that were a bit more me.
I am loving the halter neckline that is around at the moment. So I used the pattern off a dress in my wardrobe for the neckline and combined it with the leotard body pattern from the performance class. I also put a tear-drop shaped cutout in the back – because who puts a back in swimming togs? (The shape ended up being more round once it was stretched out for wearing but it still looks fine.)
I find one piece leotards to be uncomfortable and inconvenient so I made it as a two-piece with what the internet tells me is called a 'tankini'.
The big learning exercise for this project was putting in a built-in bra – method courtesy of google and guesswork. The lining fabric (this can be the same as the main fabric but I didn't have enough left) is cut using the same pattern as the outside then shaped marginally thinner towards the bottom edge that will sit just under the bust. This is sewn to an elastic band. I sewed the whole thing up at this point and worked out the cup placement while wearing it. Sewing the cups in afterwards was awkward, so I suspect there is a better way, but I wasn't sure how to do the placement without being able to reproduce the stretch that would be in the fabric when the garment is worn.
The cups are chlorine resistant but I couldn't find any proper swimsuit lining so I just used stretch lining. Given that I've been swimming once in the last ten years I'm not really expecting these to suffer from over-wear. The main fabric is chlorine-proof, left over from the performance-wear course. I looked for some woven chlorine-resistant fabric to make board shorts but I couldn't find a shop that stocked it. Some shops didn't even know what it was.
I was happy with how the swimsuit turned out. As with the dress I made with the same neckline, the neck band itself is not quite right but not wrong enough to be a problem. Unfortunately the weekend at the coast turned out to be overcast and not enticing for swimming. I'll have to hope that another swimming opportunity arises in the next decade so I can try them out.
Monday, 31 July 2017
Thursday, 13 July 2017
Halt! Who goes wear?
There's a particular kind of halter neckline that is 'in' at the moment that I really like. (Someone tell me if there's a more specific name for it – 'sleeveless raglan' just confuses people.) It's popularity, however, does not appear to have crossed into the commercial patternmaking world (leastways, not since the 70s. Again, if you know something please tell me.)
I've bought a few dresses and tops in this style but not as many as I would like. Then I found some lovely red and black paisley chiffon that I thought would work well for one. I gave up looking for a pattern and pulled a dress out of my wardrobe and took a pattern from it.
Side note: I bought this dress in New Zealand in the couple of hours we had to kill before catching the plane home. New Zealand had a completely different set of dress shops from what we have in Australia which took me by surprise. This puts me in the position of having my most favourite clothing chain closed down and my second most favourite is in another country.
Really, most of the pattern is pretty straight forward. The only difficulty comes from the neck band. I don't think I was able to get the shape quite right by tracing an already made up dress but it will do. The finished product does feel a little tight at the front while sitting a little too loose at the back, but I'm not sure how to change that.
Before jumping in with my nice (and expensive) chiffon I decided to make a mock-up from something cheap but with the intention of being able to wear it too. I found the perfect fabric on the Spotlight sale table. It's awful! So synthetic it feels like plastic and it has a camouflage print with gold specks so it's all shiny. I was very pleased with it – and only $3 a metre.
The dress was cut and sewed quite quickly. I think something went wrong when I was making the skirt patterns as I ended up with one front, two side fronts, two side backs and two backs but the front and sides were enough to get around me. I wondered if I had just traced a side panel twice but the original dress definitely has all those panels. Still, after leaving out the back panels I've got a dress that fits and that's what matters.
I've bought a few dresses and tops in this style but not as many as I would like. Then I found some lovely red and black paisley chiffon that I thought would work well for one. I gave up looking for a pattern and pulled a dress out of my wardrobe and took a pattern from it.
Side note: I bought this dress in New Zealand in the couple of hours we had to kill before catching the plane home. New Zealand had a completely different set of dress shops from what we have in Australia which took me by surprise. This puts me in the position of having my most favourite clothing chain closed down and my second most favourite is in another country.
Really, most of the pattern is pretty straight forward. The only difficulty comes from the neck band. I don't think I was able to get the shape quite right by tracing an already made up dress but it will do. The finished product does feel a little tight at the front while sitting a little too loose at the back, but I'm not sure how to change that.
Before jumping in with my nice (and expensive) chiffon I decided to make a mock-up from something cheap but with the intention of being able to wear it too. I found the perfect fabric on the Spotlight sale table. It's awful! So synthetic it feels like plastic and it has a camouflage print with gold specks so it's all shiny. I was very pleased with it – and only $3 a metre.
The dress was cut and sewed quite quickly. I think something went wrong when I was making the skirt patterns as I ended up with one front, two side fronts, two side backs and two backs but the front and sides were enough to get around me. I wondered if I had just traced a side panel twice but the original dress definitely has all those panels. Still, after leaving out the back panels I've got a dress that fits and that's what matters.
Wednesday, 21 June 2017
1830s behind the scenes
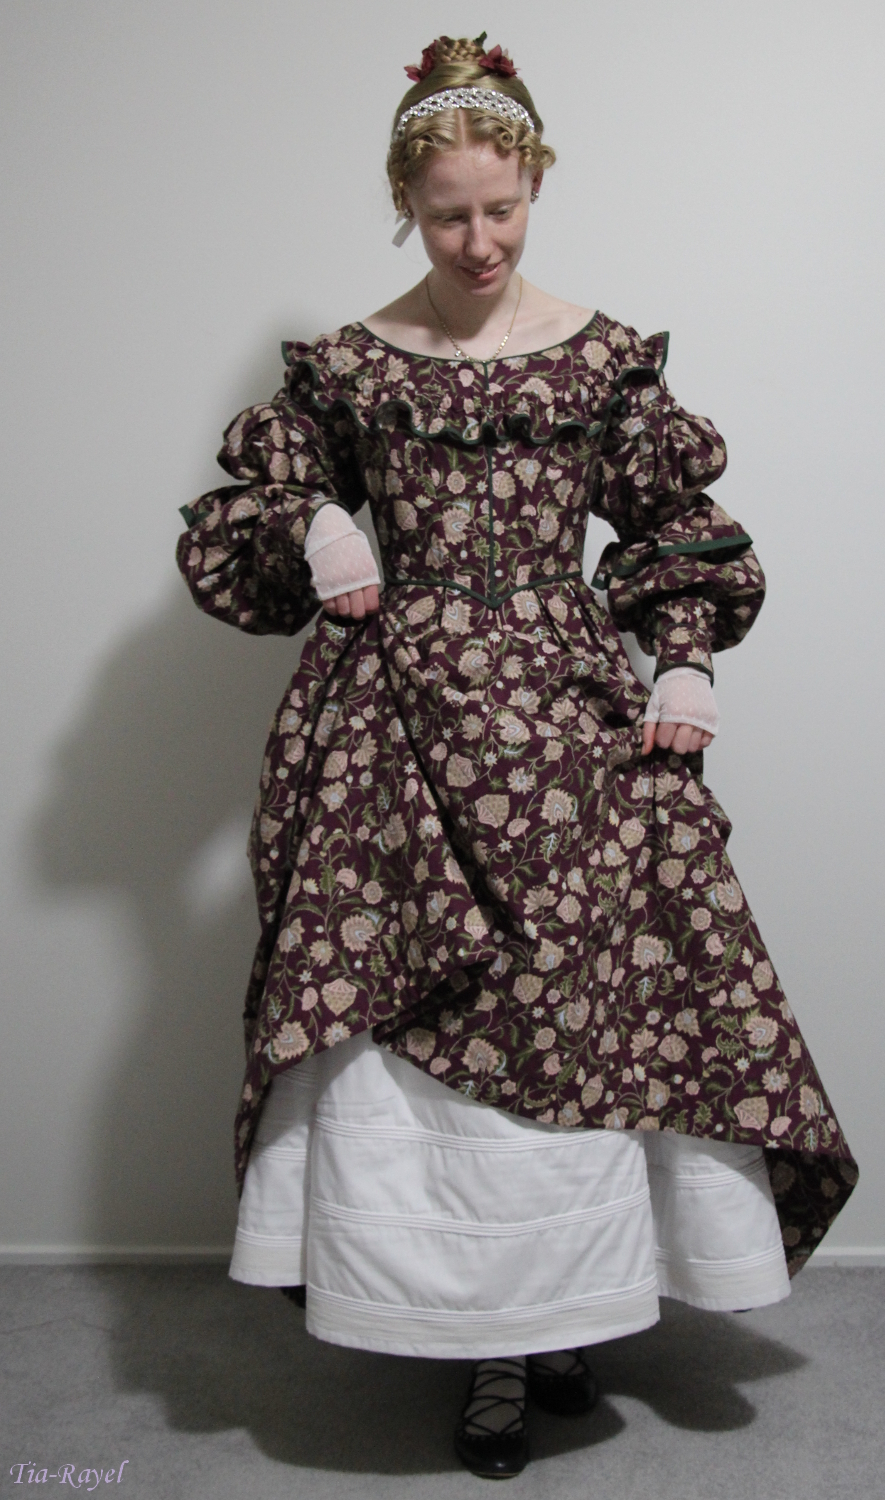
I made a corded petticoat to go with my 1830s dress. The petticoat is made from 3 widths of fabric giving it a 3metre circumference. This is possibly more than it needs to be; it does rather fold in on itself.
I cut each piece a lot longer than I wanted the skirt to be and folded the excess under to hold the cording. I sewed the cords around in a spiral. The first cord I used was my trusty, neverending roll of string that I usually use for piping. Unfortunately it turned out to be not stiff enough to hold out a skirt and because it was thin it needed many, many rows that were tedious to do. I decided to get proper piping cord (and made the poor girl at Lincraft measure out 30 metres of it). I worked out the arrangement of rows based on the length of cord. These rows went in much faster and hold the skirt out very nicely.
I used a length of petersham ribbon for the waistband and it closes with two sets of tapes.
The 1830s dress is also worn with my late regency long stays. I have adapted them since last Jafa with hip gussets and a busk. The stays are much more comfortable now.
I curled my fringe with a new method of curling – using straws. You wrap your hair around the straw, fold the straw over and use a bobby pin to hold both ends of the straw together. It worked marvellously. The straw just slides out so the ringlet is not disturbed. I also used a styling mousse when setting the curl, another thing I discovered recently.
I cut each piece a lot longer than I wanted the skirt to be and folded the excess under to hold the cording. I sewed the cords around in a spiral. The first cord I used was my trusty, neverending roll of string that I usually use for piping. Unfortunately it turned out to be not stiff enough to hold out a skirt and because it was thin it needed many, many rows that were tedious to do. I decided to get proper piping cord (and made the poor girl at Lincraft measure out 30 metres of it). I worked out the arrangement of rows based on the length of cord. These rows went in much faster and hold the skirt out very nicely.
I used a length of petersham ribbon for the waistband and it closes with two sets of tapes.
The 1830s dress is also worn with my late regency long stays. I have adapted them since last Jafa with hip gussets and a busk. The stays are much more comfortable now.
I curled my fringe with a new method of curling – using straws. You wrap your hair around the straw, fold the straw over and use a bobby pin to hold both ends of the straw together. It worked marvellously. The straw just slides out so the ringlet is not disturbed. I also used a styling mousse when setting the curl, another thing I discovered recently.
Tuesday, 13 June 2017
Ahem, a hem
I found this webpage particularly useful as it showed an 1830s dress completely inside out which is something I’d had trouble finding. Following the 'Hem from the Waist' method it describes, I hemmed the skirt while it was still separate from the bodice.
The hem of the skirt is quite deep so I did the whip stitching with the skirt lying flat on the table to ensure the fold stay lined up where it was meant to. The hemming took a few days and was not the most comfortable thing to do.
Once the skirt piece was hemmed, the waist seam was pinned to the bodice while I was wearing it, ensuring that it was the correct length from the floor all round. I found this to be an easier way to get an even length on the skirt than taking up the hem after the skirt is attached to the bodice (although still suspiciously unscientific).
The base of the hem has a strip of wadding sewn inside it to hold the skirt out. The dress is worn over a corded petticoat.
I finished the dress and petticoat four days out from the festival (probably a personal best) which gave me just enough time to make something else. All in all this dress took a month to make. I was working full time but sewed pretty much constantly when I wasn't at work, starting at 6 o'clock in the morning.
My mum did my hair in a very nice, simplistic, 30s style. Since I didn't have time to make a bonnet I wore the Polish Casquette I made last Jafa which was trimmed in exactly the right colours.
| More about the Chemise a la reine here |
I am very pleased with the finish quality of the outfit too. The insides are neat, the fit is good, my historical and general sewing techniques are so much better than they used to be and I am just all-round happy with this. I think it's my favourite costume that I've made.
![]() |
| Photo by Stephen Shaw. |
Sunday, 28 May 2017
Piping and ruffles
After the sleeves, putting together the rest of an 1830s gown seemed simple. The bodice came together pretty much over a weekend. Every piece is flat lined. All the seams are piped on the outside and finished with Hong Kong binding on the inside. I tried to follow the correct historical construction as much as I could. I found Koshka-the-Cat's series on an extant bodice helpful when choosing techniques.
I piped each bodice front and then put another row of piping around the neck after the fronts were together. Getting the angle of the front-to-neckline corner on both fronts even was painful and required repeated unpicking.
I got most of the machine sewing done on the bodice on the Saturday and that left Sunday for handsewing – I sewed early in the morning, during the sermon at church, through my Dungeons and Dragons game in the afternoon, and into the evening when I got home. It felt like it was done very quickly but there was actually a significant lot of sewing time there. I whipstitched down the piping edge (neck) and the binding (waist). At least, I think it's whipstitch – it doesn't look exactly like other examples. For the boning channels I turned over the centre front seam allowances and the bust darts (as shown on this site). I used cable ties for boning and handstitched the channel seams over the cable ties so as to make sure the channels were wide enough.
The bodice does up with hooks and eyes. The top and bottom hook are closer the edge than the rest as was often done at the time. Having the hooks and eyes arranged this way made the closure feel a lot more secure than I usually find with hooks and eyes.
I decided I didn't like the diagonal decorations on the original bodice. So instead I used a ruffle based on a dress in the Victoria & Albert museum.
I gathered the ruffle over a tape then handsewed it to the bodice.
I think it turned out rather nice.
I piped each bodice front and then put another row of piping around the neck after the fronts were together. Getting the angle of the front-to-neckline corner on both fronts even was painful and required repeated unpicking.
I got most of the machine sewing done on the bodice on the Saturday and that left Sunday for handsewing – I sewed early in the morning, during the sermon at church, through my Dungeons and Dragons game in the afternoon, and into the evening when I got home. It felt like it was done very quickly but there was actually a significant lot of sewing time there. I whipstitched down the piping edge (neck) and the binding (waist). At least, I think it's whipstitch – it doesn't look exactly like other examples. For the boning channels I turned over the centre front seam allowances and the bust darts (as shown on this site). I used cable ties for boning and handstitched the channel seams over the cable ties so as to make sure the channels were wide enough.
The bodice does up with hooks and eyes. The top and bottom hook are closer the edge than the rest as was often done at the time. Having the hooks and eyes arranged this way made the closure feel a lot more secure than I usually find with hooks and eyes.
I decided I didn't like the diagonal decorations on the original bodice. So instead I used a ruffle based on a dress in the Victoria & Albert museum.
![]() |
| Original decoration. |
![]() |
| Inspiration decoration. |
| My decoration. |
I gathered the ruffle over a tape then handsewed it to the bodice.
I think it turned out rather nice.
Sunday, 14 May 2017
Knit up the ravell'd sleeve of care
Most of the work on my 1830s dress was in constructing the sleeves.
For each sleeve, I cut out a lining of silk organza to support the puffed sections. The pleated sections of the sleeve I left unlined. The organza was not very steady to cut and all my pieces ended up being wider than the sleeve pieces they were to go with. I am grateful for this, as having the extra silk gathered inside the sleeve increased the support it gave.
I had bought 10 metres of Hong Kong binding for the dress, thinking it was a rather generous measurement, but it didn't even cover the sleeves (all that remains is in the picture above) so I went back and bought the same again. I was rather pleased with how the bound edges turned out. I had been increasingly dissatisfied with the quality of my garment internals; the Canberra show judges had recommended I improve there and this was a method used historically that was effective and looks good. However, I must confess to using the (historically accurate) cheat method of sewing through both layers of the binding at once.
The top edge of the silk was gathered to the pleated sleeve. The lower edge was sewn to the sleeve (only slightly gathered) and then it and the sleeve were gathered together and secured to cotton tape.
On to the lower sleeve. Again there are pleats around one end and gathering to fit the upper sleeve (and adding a cuff).
I made the cuff to fit my (narrow) wrist, not the pattern, so unfortunately the pleats had to be gathered a little to fit. The cuffs close with two hooks and eyes on the cuff and another in the split above the cuff.
The join between upper and lower sleeve sections only just made it around the arm of my sewing machine. What is it with modern machine and really wide arms? It makes it so much harder to sew sleeves – and sleeves aren't exactly an unusual thing for people to be making on sewing machines.
The final result:
Lastly I made six piped bands to be placed at different intervals on the sleeve. The pattern had the bands cut on the fold and only piped one side but the original dress clearly has piping on both sides. Why would you not pipe something when you could pipe it? (That said, I have seen extant dresses done the pattern's way as well.)
Once constructed, the rings are handsewn over the stitching lines around the sleeve. Thank goodness for that! I had decided to have No Visible Machine Stitching on this dress and I don't even want to think about doing the entirety of the sleeve by hand.
There is a cotton tape running along the inside of each sleeve to hold the gather points at the right level. I ended up putting the tape on the outer side of my arm (opposite of the diagram above) as I found that the structure was more needed there. When I first tacked it on the inside of my arm the fabric was inclined to bunch up uncomfortably.
If I were to make 1830s again (and I plan to) I will do different sleeves (which will require patterning my own). This is not because I don't absolutely love these sleeves but because the 1830s had so many fabulous sleeves that one can't afford to do any style more than once.
For each sleeve, I cut out a lining of silk organza to support the puffed sections. The pleated sections of the sleeve I left unlined. The organza was not very steady to cut and all my pieces ended up being wider than the sleeve pieces they were to go with. I am grateful for this, as having the extra silk gathered inside the sleeve increased the support it gave.
I had bought 10 metres of Hong Kong binding for the dress, thinking it was a rather generous measurement, but it didn't even cover the sleeves (all that remains is in the picture above) so I went back and bought the same again. I was rather pleased with how the bound edges turned out. I had been increasingly dissatisfied with the quality of my garment internals; the Canberra show judges had recommended I improve there and this was a method used historically that was effective and looks good. However, I must confess to using the (historically accurate) cheat method of sewing through both layers of the binding at once.
The top edge of the silk was gathered to the pleated sleeve. The lower edge was sewn to the sleeve (only slightly gathered) and then it and the sleeve were gathered together and secured to cotton tape.
| The top of the sleeve is shaped by inverted pleats. |
| Last steps for upper sleeves: seam and hem binding. |
I made the cuff to fit my (narrow) wrist, not the pattern, so unfortunately the pleats had to be gathered a little to fit. The cuffs close with two hooks and eyes on the cuff and another in the split above the cuff.
The join between upper and lower sleeve sections only just made it around the arm of my sewing machine. What is it with modern machine and really wide arms? It makes it so much harder to sew sleeves – and sleeves aren't exactly an unusual thing for people to be making on sewing machines.
| The struggle is real. |
Lastly I made six piped bands to be placed at different intervals on the sleeve. The pattern had the bands cut on the fold and only piped one side but the original dress clearly has piping on both sides. Why would you not pipe something when you could pipe it? (That said, I have seen extant dresses done the pattern's way as well.)
| One edge of each ring is handsewn closed. |
If I were to make 1830s again (and I plan to) I will do different sleeves (which will require patterning my own). This is not because I don't absolutely love these sleeves but because the 1830s had so many fabulous sleeves that one can't afford to do any style more than once.
Subscribe to:
Posts (Atom)