Saturday, 31 October 2015

We all make choices, but in the end our choices make us make clothes

With sewing lessons booked, I decided to put all sewing projects on hold until I had completed the lessons but halfway through the course I couldn’t bear it any more. So on a Friday night, after having handed in a uni assignment during the day, I decided I must have a new dress now and started scouring the pattern boxes and the stash.

I wanted something 1940s style, particularly in the vein of this dress:
Source
My sudden interest in 1940s dresses came about because for the last few months I have been playing through the Bioshock series of video games. The first two games are set in the 60s but in a city that isolated itself from the rest of the world in the 40s, so the styling of the place is more reminiscent of the earlier time. Fiction I consume tends to make it to my wardrobe almost as fast as it gets to my brain, so after a few hours of starting at a computer game full of 40s clothes I began staring at my cupboard wondering why there weren’t any there. I wanted some 40s-style dresses of an everyday, utilitarian kind, which is bizarre because I am usually all about the extravagant.

My pattern search turned up very little that was useful but I did find a 1970s bias cut 4-gore skirt pattern that was nice and picked one of the blouse patterns fairly arbitrarily – probably for the sake of the sleeves. The drawings on the front make it look alright but it really is horribly sack-like.
I spent the evening making a mock-up and adapting the pattern. In the bodice, I added pleats to the waist, gathers to the shoulder seams, changed the neckline and swapped the button up front for a zip in the back. I also made the back more fitted by tracing from this tunic which fits me very nicely.
This meant adding fabric in the shoulder area and losing a fair bit in the waist. The changes were all done by draping the mock-up which I then took apart and traced back onto the pattern. I have since been assured that this is very much The Wrong Way to do things and that centre back seams should be straight. This is why I’m having lessons. That said, it still worked although perhaps doesn’t sit as nicely as it could. The skirt I left as it was except that for the waistband I just cut a strip of fabric to my measurements and gathered the back skirts and bodice to fit it (they didn’t need to be gathered much). By 1.30am I had a mock-up I was happy with.

On Saturday, after spending the morning doing assignments, I bought fabric, washed fabric and cut fabric. The fabric I got is a printed homespun. It has a much nicer texture than other ‘homespun’ fabric I have used – I think it might be brushed. It also didn’t crinkle after washing which is very pleasing.
I sewed Saturday night and Sunday Morning but was foiled in my attempts to finish the dress on the weekend by lack of an invisible zipper foot for my new machine. I bought one on Monday and finished the dress. I had a false start with the hem because I decided to be different and actually look at the pattern instructions which recommended a 1¼" turn up finished with bias. I did this and it looked awful. So I have redone it with my usual method of a small double fold hemmed by hand.
I like this dress. So do other people, apparently – it’s done fairly well in the random compliment stakes. And someone took one look at me and said "40s dress" so I think I succeeded stylistically. Another time I would put side seams in the waistband to give it shape but otherwise I would leave it largely as is. Of course, when I make this style of dress again I will probably adjust other things for variety but I am very happy with this dress.

Saturday, 17 October 2015

Anniversary thoughts

I have now, as of September, been costuming for 10 years. At the start of the year, when I finished my Eowyn costume, I found myself reassessing my hobby. The last few things I’ve made I have been really happy with and proud of what I’ve achieved but they still weren’t as good as I wanted. I am aware that nothing ever will be – but, while over the last 10 years I’ve watched my standard of work constantly improve, at the beginning of this year it seemed to have plateaued.

I’ve felt a need to ‘level up’ my sewing before. At the first Jane Austen festival I went to I was inspired by the quality of the other costumer’s work, including these two bloggers. After that I started doing little things, like pressing seams during construction, which add so much to the final look of a garment and my quality of work improved significantly in that period.

One of my favourite things about costuming is the constant learning. With every costume you have to acquire new skills and improve your techniques. But at the start of this year it seemed to me that I was no longer doing that. My work was good but I consistently had fitting problems. I was also taking too much time and too many mock-ups to create a pattern through a guess and check method. I was sure there were better ways to do things but I seemed to have reached the limit of what I could teach myself. “I’ll just have to give it up” I thought to myself. I don’t think I ever seriously considered that – I love sewing too much – but I needed to find away to continue to improve.

These are my planned projects (subject to change at any time, etc) that I’m excited to keep improving my skills with:
At the same time, people were beginning to ask me to give them lessons or make costumes for them. Lessons were a bit awkward because while I definitely can sew I don’t have any verified techniques or knowledge to pass on. Commissioned work also posed a problem because while I didn’t want to work for free I also wasn’t comfortable with charging by the hour when I was using techniques that were inefficient timewise. I also didn’t want to charge a lot for work that wasn’t finished in a professional manner. Which, given the time cost to me that a commission represents, made significant projects for others not something I could do.

I have not done any sewing for a few months. But this is not despair – it is hope! In July I enrolled in sewing lessons but they didn’t start until the end of September so I decided to put off all projects until after the lessons so that I could use my new skills to make my costumes as good as possible. (It was also really convenient – I spent that time either being sick or desperately trying to catch up on uni because I had been sick, and benefited from not having my brain trying to figure out a sewing project as well.)

I have been excitedly looking forward to the course since I enrolled, greatly confusing everyone I told about it who all looked weirdly at me and said ‘but you can already sew’. But I knew I would learn better, more effective ways to sew and I couldn’t wait. I am starting in the beginner class but that doesn’t mean it’s all easy or just going over things I know. It’s ‘beginner’ - not as in simplified but as in these are the proper, professional foundational techniques that you need to know first, before you learn the other ones. I’m nearly finished the first class in the series and I have learned so much. I’ve also bought so much – the first lesson was on useful tools.
Loot!

Tuesday, 6 October 2015

We Could be the Same

One of the weird things about costuming is how while you’re working on a project it can be completely consuming but after it’s finished it can just disappear completely. This is why it is important to photograph projects. I was looking through my photos a while back and got a shock to see these dresses because I had completely forgotten I made them.

Actually, that’s not completely true. I remember doing the painting. I know I spent a summer carefully painting these designs on a table with a lamp under it with a recording of Eurovision 2010 playing over and over again in the background. But that’s it. All the construction memories had gone and even the painting memory wasn’t attached to a particular project, just Eurovision.

(Suggested listening here. Or here if your musical tastes tend to calmer)

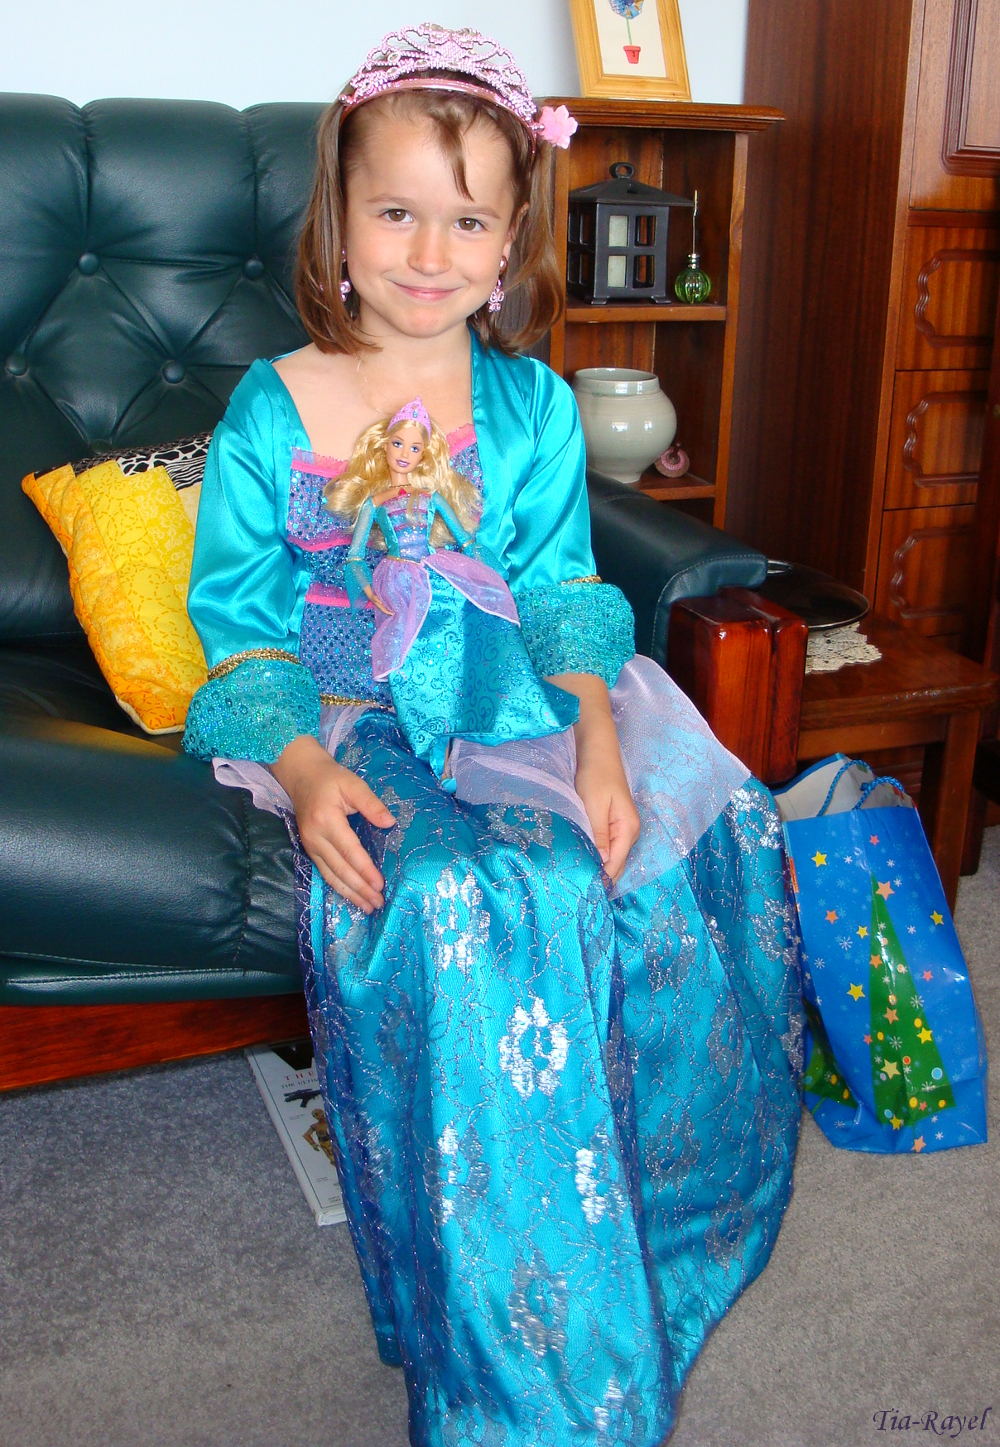
A long time ago I made a Barbie as the Island Princess costume for one of my cousins. A year or so later I had a request for two Barbie outfits so they could have one each. This time the costumes were from Barbie and the Three Musketeers.

 The short, sparkly skirts were easy – one seam, elastic and hem.
According to my notes, for the bodices I used Vogue 7845. (My notes don’t say a lot else, unfortunately.) As with the Island Princess dress I decided to have fabric over the shoulder for inset sleeves rather than having the dress held up by semi-detached sleeves. Because the necklines were annoying enough as it was I didn’t want to have to deal with having them open and close. Instead I made the bodice closure using a trick I’d learnt from a princess bodice I found in an opshop: put the zip in upside down.
By far the biggest challenge of this project was the painting. Each dress in the Barbie Musketeer series had its own skirt design repeat and bodice design repeat. As ever, I wanted to be accurate so I had to recreate these. I also decided to correct the off-centeredness of the patterns found on the dolls used in the promo photos I was using as a reference.

To make the patterns I spent a lot of time fiddling with autoshapes and curled clipart in PowerPoint (PowerPoint is an excellent graphics manipulation program).

This was the result, for the bodice and the skirt front:
 
We printed it out full size and I’m not sure what happened next. I know I painted by tracing something, probably a drawing based on of the printout but with the lines curved correctly and the swirls the right length (the computer design was mostly for scale and placement). I suspect I used a seperate set of transparencies for each colour and traced over these. As with all freehand designs I got my mum to draw out the tracing guide because I am not neat enough. 

For the purple stomacher I printed out a photo of the doll bodice at A4 size which was blurry but the pattern was visible. Mum drew it for me on plain paper and we photocopied it onto a transparency I could paint over. 
Mum also drew out the skirt design for me. The doll dress has kind-of glowy pink bits in the dress panel and I managed to find a gorgeous satin that had the look of being softly dyed with different shades.

Here are the finished results:


This was the project where I discovered fabric paint which turned out to be a very useful discovery. In particular, the gold bottle which I bought for this dress has served me very well.

The skirts are all lined with gold satin and close with hooks and bars.
Completed dresses:
 
(Please excuse the crumples – the dresses had been in a suitcase for two days.)


Barbie belongs to Mattel

Saturday, 26 September 2015

Island Princess

Barbies were never my thing. In fact dolls were never my thing. When I was little I preferred animal toys and, when I was a little older, historical figurines. My favourite Barbie-related activity was listening to a boy from church talk about his plans to rid the world of Barbies through means such as melting or lasers. I spent my childhood avoiding the ‘pink aisle’ in Kmart and didn’t enter it willingly until I was 16 and needed a costume for a barbie-themed party. I put together an appropriately princess-y costume from the dress-up box and made myself a full length velour cape the day before.
I have since made velour capes for cousins and another one for myself to wear as ‘real clothes’, without the train, since mum said the trained one was too much of a hazard (for other people) on the stairs.

While researching for this party I got past a lot of my Barbie aversion because they do have some very nice dresses – and nowadays no-one’s expecting me to play with dolls.

All this meant that when my cousin requested a ‘Barbie as the Island Princess’ costume for Christmas one year I looked on the project more positively than I otherwise might have done. It was a new challenge (adapting dolls’ clothes) and a nice dress.
I used Butterick 4887 as a pattern for the basic dress shape as I had made it for this cousin before. I think I reduced the skirts a bit the second time because that pattern has so much skirt.
The first Butterick 4887 dress, seen here with afore-mentioned velour capes.
In order to give the impression of patterned fabric on the skirt, I used a layer of lace fabric over the satin. It was sewn into the seams and hem in order to appear as one skirt and not as a separate overlayer. The pink overlayer was draped.

After much consideration I decided that the straight neckline with attached sheer Bolero-like sleeves was not going to be practical on a child’s gown. Instead I used the bodice pattern as is and made it all out of satin.

I had bought three different sequined fabrics for the stomacher, but when they were put together the differences in colour and pattern were distracting. Instead I used the same fabric on all three levels but layered it so the colour got darker with each layer. The whole thing is lined with pink which showed through under the top layer.
The dress was very popular with its recipient.


Barbie belongs to Mattel.


Tuesday, 11 August 2015

Regency Outerwear II

The days leading up the Jane Austen Festival this year were very cold, so at the last minute I decided to make a new spencer as the one I already had did not go with most of my dresses. I thought I could get it done in time (ha ha) because I had a pattern that fitted me already and sufficient materials in the stash. I chose neutral fabrics so the spencer would go with as many dresses as possible: leftover suiting for the lining and the leftover gabardine from my Viking outfit for the outside.
Mum cut the pieces out for me while I was sewing my orange dress. She also came up with the idea for trimming, based on this dress in Fashion in Detail. Unsurprisingly, I didn’t even start sewing the spencer. Happily, the weather cleared up for the festival so I didn’t need it. It also proved fortunate that I didn’t get the spencer done because with my new stays I was a slightly different shape and my perfectly-fitting spencer pattern no longer fit perfectly. Having more time for this project allowed me to fit it properly and to draft a collar pattern, because I didn’t really want to make the same spencer twice.
 I'm so pleased with the collar.
The sleeves are trimmed with plaits of rouleaux. I would like to have had the same trim on the bodice but there was no fabric left.
Trim inspiration.
I wanted this spencer to fasten all the way up the front so I had to choose a method to close it. I settled on self-covered buttons and loops. I kept the drawstring at the waist from my last spencer because it worked very well in ensuring the spencer fits nicely.

Sunday, 12 July 2015

I dearly love to laugh

A while ago I posted about my plans for new dresses for the Jane Austen Festival. I didn’t finish either of the dresses in time but I did get one of them complete enough to be wearable. I wore it to the ball sans trims and safety-pinned up the back. The open robe conveniently hid the safety pins.
photo by Steven Shaw
I don’t care for regency era fashions so, even though I had spent the year leading up to the festival looking at fashion plates and extant clothing because I wanted new dresses to wear this year, I hadn’t come across much that interested me. I eventually found a ball gown that I liked, but no dinner/evening gown.

A while ago I had read this Jane Austen/The Dark Knight pastiche and shortly after had gone on a boring bus trip where I had passed the time with the mental exercise of designing a kind of regency Joker-themed dress.
As JAFA got closer, that design kept re-occurring to me. It was an evening gown… but it was also a Ridiculous Idea(TM).

In the end no better idea occurred to me. So to justify doing something so unnecessary I then went and found a bunch of historical references for each of the design features. (If I'm going to be ridiculous I want to feel smug about it.)
Bright orange - Centraal Museum
Bright purple
Sheer undersleeve and velvet ribbon
Back lacing - Chateau de Malmaison Costume Collection
Gathered sheer at the neckline - Mademoiselle Caroline Rivière by Jean Auguste Dominique Ingres
Buttoned tab at centre back - Habit Spencer worn by Queen Louise of Prussia
Front design for open robe
I couldn’t find any open robes that could represent tails so I made do with short and shaped towards the back.
Contrast lining
I didn’t bother to make sure the references were all from the same time period, so I may have, uh, introduced a little anachronism.
I like the seam shapes at the back of some regency dresses but the pattern I was using (evolved from diagram 37 in The Cut of Women’s Clothes) didn’t have them so I had to modify it.  I tend to redo the bodice every time I make a regency dress but the skirt is perfect and it’s such a relief to be only adjusting the smaller pattern pieces; the skirt piece is exactly right and doesn’t even need to be trimmed to length for hemming.
The sleeves and hem of the dress are trimmed with gathered chiffon.The gathering on the hem of the skirt is topped with green velvet ribbon. I was planning to pink the edges of the chiffon – since that seems to be the historical thing to do – however my chiffon didn’t last very well pinked. It is not particularly susceptible to fraying but the threads that pull out don’t snap very easily and pose a tripping hazard. I nearly caved in and used the very non-historical method of flame-melting the edge of the fabric but I finally decided on doing a rolled hem. My last attempt at a rolled hem had been on an overlocker in a high school textiles class and it had not turned out well (the stitching refused to stay attached to the fabric and nothing rolled anywhere). But I discovered, quite by accident, that my new machine can do nice ones (albeit very visibly machine sewn).
The chiffon on the puffed sleeves I left un-edged and trimmed with green satin ribbon. At the cuffs I used the satin ribbon as a drawstring. The open robe is lined with green satin.
The neckline is trimmed with gathered chiffon - I’ve been wanting to use this technique on a dress for ages. I gathered the fabric by sewing a channel near the edge and running some green ribbon through it. I like how it looks, but I think if I did it again I would not use so much fabric. I had meant for it to still be a bit transparent and for the ribbon to be visible.
I considered several different closures for the dress. I didn’t want to use buttons because they would disturb the smoothness of the open robe. Instead I decided on spiral lacing. I did the eyelets by hand, even though I now have a sewing machine that can do them, because the hand-bound ones look nicer and don’t require cutting the fabric. The deciding factor between hand and machine for me is how easy the fabric is to sew through, and the orange fabric was on the easy end of the spectrum.
The open robe closes with hooks and eyes, which I have mixed feelings about. The tab at the back is attached with shell buttons. The buttons are mother of pearl on the other side, but that wasn’t degraded enough to be a Joker reference.
 This outfit is overwhelmingly orange to wear. I (foolishly) hadn't been expecting that.


Joker image belongs to Warner Brothers