Saturday, 27 June 2015

Lengthy holidays at the Prince’s hotel*

I have written before about how my bodiced petticoat is better than short stays over a chemise. When I began fitting patterns for my new regency dresses I discovered that the bodiced petticoat had a fault of its own: putting it on for 10 minutes would give me back-ache for the next three hours. It’s been a few years since I made it, and quite a while since I last wore it, so I supposed I may have changed shape a bit.
I decided to (or rather, needed to) make new stays. I decided to try long stays as my experience with other corsets has been that most of the support comes from the hips rather than the shoulder strap. I think the strain on the shoulder straps was the main source of my discomfort in the short stays.
I started with the long stays pattern from Corsets and Crinolines scaled up using my favourite method of a data projector and paper stuck to a wall. From this I produced a mock up but the fit was really odd so I decided to try a different approach.  

On myself I measured the length I wanted the stays to be and I measured my circumference at a lot of different points. I worked out roughly where on me I wanted the edges of the front panel to be and measured that. On my pattern paper I drew two horizontal lines to mark the length of the stays; one marking the top and one the bottom. On the pattern paper I marked the various points at which I had measured the circumference. I then used the Corsets and Crinolines pattern to create the shape of the front pattern piece according to the measurements I had taken. For the other pieces  I shaped the edges by tracing the basic shape from the Corsets and Crinolines pattern but changed the angles and distribution so that, at each of the points on my body that I’d measured, the pattern would have the right circumference measurement to fit me.  

I have no Idea if this is the proper way to fit patterns (or a reliable way) but it worked fairly well on this occasion. (I’m sorry if the explanation above was incomprehensible.) 
The stays are made from two layers of fabric interlined with coutil. I experimented with having a busk but I didn’t like the shape. Instead I put in a small number of cable ties (because I didn’t want to research cording or reed). I did some quilting over the front, vaguely inspired by the design in the book (although my design became significantly simpler as I grew tired of doing quilting). I got my new sewing machine when I was nearly finished this project so I was able to test out the eyelet feature. The eyelets it sews (and especially the hole made by the eyelet punch) are smaller than I am used to, so I had to use bodkins when lacing - but otherwise they’re good. The only problem was the machine doesn’t like non-level surfaces or small spaces, so I had to do the eyelets in the bound strap by hand – which made me even more glad I had a machine to do the rest.  
I wore my new stays to JAFA over an old, bulky chemise and discovered a host of problems that need to be addressed. (That’s what a first wearing is really for though, isn’t it?) The worst one was that the front, cable ties included, spent most of the time folded up on itself. I propose to solve this by using a wooden busk (like I should’ve in the first place) and putting in hip gussets. The pattern in Corsets and Crinolines had hip gussets but I took them out, because it was way too big in the hips, and reshaped the side panels. Turns out it does need a bit more give.

I feel like I’m just ‘making stuff up’ as solutions to my problems rather than actually knowing what I’m doing. I’ve made 13 corsets and corset-like garments now and I still can’t seem to get them right. I think I’m missing something fundamental about the mechanics of a corset but I don’t know what. We’ll see if my plans work.
All that said, I am happy with how these stays turned out. They are more comfortable than short stays or the bodiced petticoat and they give me a better regency silhouette. Once adjusted, they will be even better.


*Googling ‘regency stays’ finds you lots of “Regency” hotels; ‘regency stays backache’ finds you the ones with uncomfortable beds.

Sunday, 7 June 2015

"Through Rohan over fen and field where the long grass grows"

I've finished my Eowyn costume. It only took a month and a half longer than I wanted it to. (I actually finished it back in March, but wasn’t able to take photos until now.)

This is the original:
I had a couple of significant difficulties when making this that took some time to solve. They are why my quick 'holiday project' ended up taking so long.

The Trim
The trim and the collar caused the main delays. I never did find the right trim. So instead, I painted my own. (“Paint it instead” seems to be a recurring theme around here.) I got mum to draw out the design on a transparency (‘cos she’s much neater than me) then I lit it from below through a glass table to trace it onto the fabric. I actually had to use a clear plastic container on top of the table, because the glass was so textured that it was hard to distinguish the pattern from the shadowy background.

This is the template I used:
This is my painting setup:
I am very happy with the result. It wasn’t too painful to do, nor did it get much messier as I went along as I had been afraid it would. While doing handwork on my costumes I like to watch or listen to something. For this costume my 'topically appropriate' listening was The Tolkien Professor podcasts
The trim in place.
The Collar
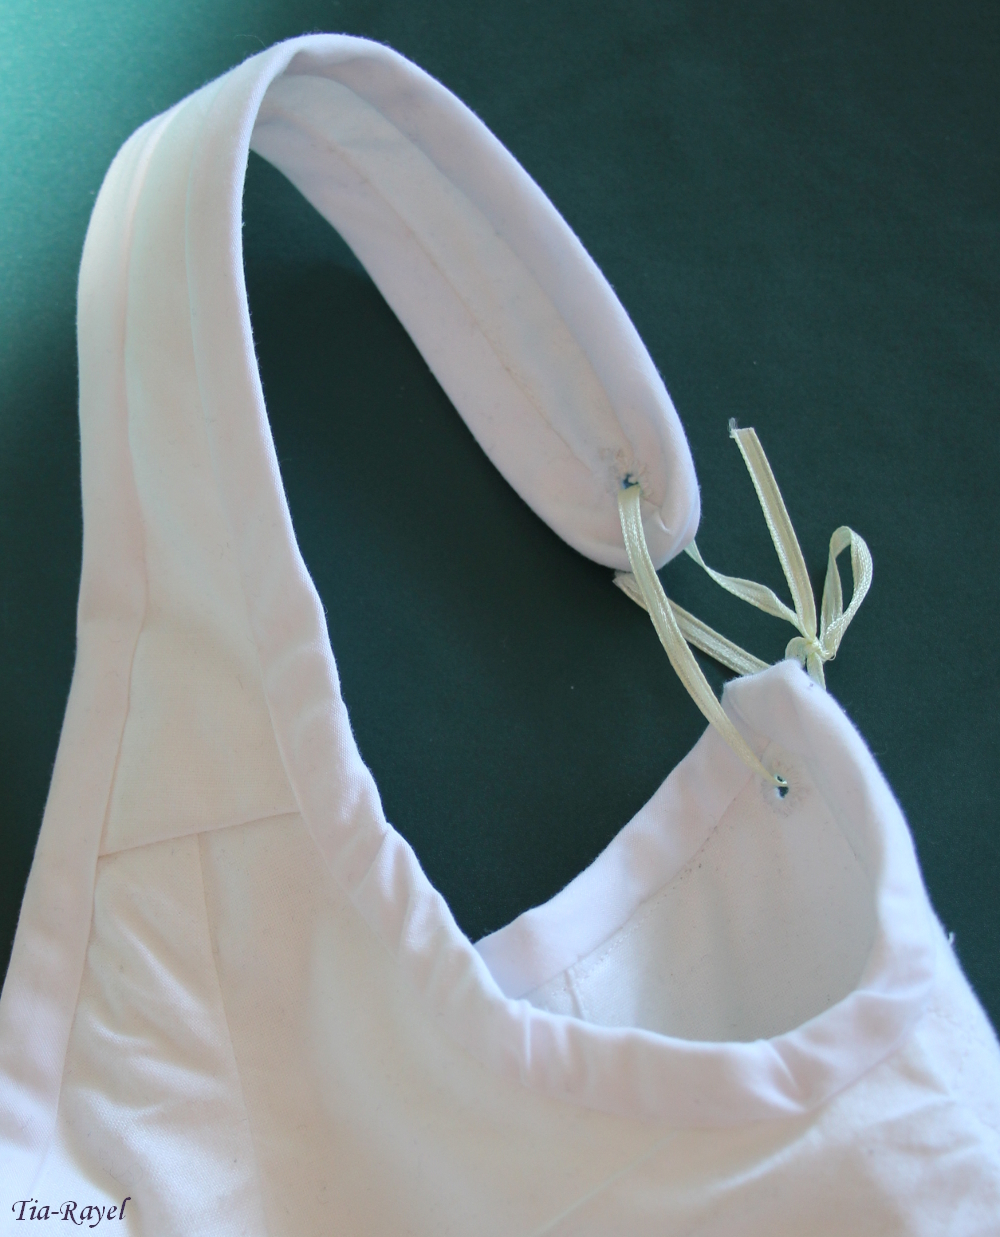
After trying many ways of draping the collar, and having none of them work, I gave up. I searched for a pattern to adjust but I couldn't find one. I nearly despaired of finding a way to make this collar work and I had to stop working on the costume because I didn't know what to do. Then, weeks later, a new method occurred to me and it worked! I started with a long rectangle and cut the back neckline shape cut into it at the centre. Then I folded it around to the front. To get the shoulder shape there is a shoulder seam that forms two pleats that curve the collar over the top of the arm. 

It looks like this on the inside and outside:
I fiddled with the fronts until they had the three-pleat look of the original.
The Belt
The belt wasn't so much a delay-making problem but is something I want to fix - when I work out what to do with it. At present it doesn't really have a doing-up mechanism.

My belt is made from burgundy fabric, brocade trim, wool, painted beads and earring parts. I couldn’t find anything the right shape for the belt loops but the earring parts I found had flowers very like the design associated with Eowyn, as seen on her necklace, so I thought they’d do.

What I didn’t realise was that I would actually need three as there are two loops on the belt and also a third loop on the woollen cord hanging from the belt. I couldn’t find a third loop of the same kind, so I’m making do.
The Buttons
The buttons I got at the closing down sale of our local patchwork shop which made this feature more economical than it would have been otherwise. They are purely decorative as the outfit actually closes with snaps - but it probably won’t for much longer since they keep popping apart while I’m trying to do them all up and they aren’t technologically appropriate for Rohan. I’m just not sure what I can replace them with.
Pictures
Yesterday Mum and I went to a nearby hill to do a photoshoot. My Dad had given me a replica of Eowyn’s sword for my birthday to go with this costume, so I had fun with that.


The Lord of the Rings images belong to New Line Cinema.

Monday, 25 May 2015

Thinking inside the box

A few weeks ago I decided enough was enough. It wasn’t good enough to have patterns all over the place – some in boxes in the sewing room, others in a basket in the spare bedroom and some in drawers. Whenever someone wanted a pattern they had to look in every spot (assuming they could remember all of them). If you asked my mum, she would tell you that the patterns were divided between her patterns and my patterns but if you asked me I would say the split was between ‘real clothes’ and costumes.  These two divisions almost matched but differed enough to make everything hard to find.

I googled how other people stored their patterns and found that some people have not very many patterns and other people have patterns that are all the same size, and some people have more dedication than I do, either to organisation or interior design. I decided new furniture was not an option but that a labelled set of boxes had potential.

I looked briefly at buying boxes but they were mostly outside my budget and didn’t come in useful sizes. The plastic boxes didn’t even have straight sides – not so great for storing envelopes, which do.
Copier paper boxes proved to be the right size. They were easy to accumulate as our various workplaces go through lots of paper and have no use for the boxes. However, these boxes are ugly and the different brands don't match. I’ve seen some people online who make lovely decorative storage items and I was briefly tempted to try something similar. But I decided this would slow down the organisation process considerably – I was already fed up with the state of things – and that I am not crafty or neat enough to produce something I would be happy with. So I decided to cover the boxes with black contact which would be easy to do and wouldn’t visually clutter the room. Of course Kmart ran out of black contact before I had enough boxes covered ...

The next step was working out how to divide the patterns. There are so many options: type of garment, type of wearer and ‘genre’.  And each division should be near, but not quite the capacity of one box. To solve this problem I sorted the patterns on a grid:
x-Axis: Men’s clothes, children’s clothes, complete outfits, outerwear, dresses, skirts & pants,  tops, accessories
y-Axis: Normal clothes, ‘real clothes’ (which would be costumes to anyone else), fantasy costumes, historical costumes

The final categories are:
  • Women’s Tops, Bottoms and Two-Piece outfits
  • Women’s Dresses, Vests and Outerwear
  • Women’s Fantasy Costumes
  • Women’s Historical Dresses and Outfits
  • Women’s Historical Underpinnings, Outerwear and Accessories
  • Men’s Fantasy and Historical Costumes
  • Children’s Real Clothes
  • Children’s Fantasy and Historical Costumes
The boxes are the right size to have standard pattern envelopes neatly in a row down one side while the large envelopes and zip-lock bags can lie along the other side.

I don’t have a box for the historical costumes yet and I suspect they will need a different type of box, given that the patterns are much bigger and bulkier than any of the others.
This project is part of a larger effort to neaten the sewing room (and the spare bedroom that it frequently spills into). Most of the flat surfaces are done, just under the table and the sewing machine cabinets to go. Since we now have two new sewing machines, the cabinets are undergoing major rearrangement – and changing hands.  

The room is so much nicer without large plastic containers lying around and cluttering the floor. And last week, when I needed a certain kind of bodice pattern I knew exactly where to look for it. So I am declaring this organisation scheme a success. 

Sunday, 19 April 2015

We share the glory of our victories

And here’s the last Assassin’s Creed costume: a Brotherhood outfit for my dad.
Last time I posted about this outfit I had finished the jerkin and hood. The doublet took longer because it is made of 64 pieces. For instance, there are 6 tiny pieces in each lower sleeve cap.
I used several different techniques to join the pieces in order to look as close as possible to the references. (Topstitching with zig-zag turned up a lot.)
 Shown here: bound and topstitched, straight-stitch topstitching, and zig-zag topstitching.
I had been planning to line the doublet, but in the end I decided to have a red facing only on the collar. Any more would have been unnecessary bulk.

The fit of the doublet was disappointing. The muslin I made fit properly but the real thing ended up being too big, and I’m not sure why. And fixing it would be very complicated. Thankfully, the original is not a closely fitted garment and the sash holds it together. (Actually, I haven’t made the sash yet – how I make it will depend on how I decide to make the insignia for the belt. The sash in these photos is just leftover fabric)
To get the decorative design down the side of the cape I didn’t even consider hand embroidery! I found a trim at Lincraft that worked perfectly.
I haven't made the leather attachments for the capes yet, but I plan to work on that later in the year.
I made both our undershirts at once, assembly line style.
Mass producing cuffs.
All the cuffs do up with small Dorset buttons left over from the Lucy costume I made earlier in the year.
Dad’s shirt has a ruffled collar which I made with cartridge pleating. My test run worked, but wasn’t quite right so I opted to be lazy and sew it down by machine. If I figure out a better way of constructing it I might redo it more carefully.
Overall, I was very happy I got to make this. Working out how to put it all together was a great challenge which I enjoyed. However, in this, and several other outfits I’ve made recently, I have not been as successful at achieving the desired fitting as I would like to be, especially when working from measurements. Even though I would like it to be a bit better, it has turned out fine and I’m happy with it and Dad is very pleased with it.


Assassin’s Creed belongs to Ubisoft.

Thursday, 2 April 2015

You had plans, and look where that got you

I had a plan for sewing this year. It would ensure everything was done in time for deadlines, avoid ‘busy’ times of Real Life and give me a feeling of accomplishment for use whenever I was stressed.

  • The assassins would be finished sewing by the end of 2014 (tick – finished at 3am on the 31st).
  • Eowyn, a ‘quick’ and ‘easy’ costume, would be done by the end of January.
  • Before Uni went back at the end of February I would have fitted the patterns for my Regency dresses for JAFA and got a fair bit of the sewing out of the way.
  • March would have been spent finishing the JAFA outfits well ahead of the April event.

What actually happened was I finished Eowyn at the start of March.
Then, starting on my regency outfits, I discovered that my bodiced petticoat gave me terrible backache. I tried it on for 10 minutes and was still sore 3 hours later. I don’t know how I survived at JAFAs past. My short stays are just as bad – which I suspect is why I still thought the petticoat was an improvement; and it was definitely better in terms of bulk under the dress.

So step one was not fitting dress mock-ups but rather new underpinnings. I tried to adjust the bodiced petticoat but I couldn’t work out a way to fix the problem. I believe the pain came from the straps being too short, but if they were made longer the bodice no longer stayed in the right spot. So I’ve spent the last few weeks patterning and making long stays.  I will need a new chemise to go with the new stays but I don’t have time to make one now. I will have to make do with a bulky old one or perhaps my slimline 1913 petticoat.
Another complication was the expiry of my sewing machine. In 2008 I inherited my great aunt’s 1976 Husqvarna 2000. Aunty Gladys had been a keen sewer and wanted her machine to go to whomever of her relatives showed an interest in sewing. That machine served me very well but at its last service I was told it was broken beyond repair. So not only was I behind on my plan, I had to research and buy a new machine. I was able to use my mother’s machine for the majority of the sewing on Eowyn and the stays but needing to get my own new sewing machine was another thing niggling at the back of my mind. Last week I bought a Brother NV610 so sewing life is getting back to normal.

Now that I have a sewing machine and my stays are nearly finished, I have finally got to the ‘fit and make two regency dresses’ part of my plan. Except now I have two weeks instead of two months. My original plans were for a ball gown from a fashion plate and an evening ensemble of my own design. I am preparing myself for the likelihood that these may not happen. But the Uni holidays are coming up and I have made regency clothes before so I have hope… We’ll see what happens.