Friday, 5 September 2014

A week is a long time in medieval dressmaking

I completed my cousins’ outfits a week before we left to see them and all go to the Abbey Medieval Tournament together. So I had time to make a new outfit for myself as well. I’d had a few ideas floating around the back of my mind and of them I decided on a Viking outfit, as it seemed the most achievable (at last! a sensible decision).

I had been accumulating information on Viking clothing over the last six months or so and I spent Saturday morning sorting through this to choose my design and pattern.  Thankfully, I found perfect fabrics in the stash which saved me a trip out to Spotlight. I spent the afternoon mocking up the apron dress.

On Sunday I finished my cousin’s shirt – because I hadn’t actually finished everything, but I knew I was going to, and that’s the important thing.

On Monday and Tuesday I cut my fabric and did all the machine sewing. I did some of the hand-hemming after work on Wednesday and Thursday. Friday was dedicated to packing.  We left on Saturday and during the evenings of the next week (while we were travelling and staying with family) I finished the hemming, attached the straps and did the row of decorative embroidery.

On the first day of the festival, I wore my Venetian gown again. From one of the stalls I bought the beads and mjolnir which I attached to my apron dress in the evening. It was finished and ready to wear on Sunday.
Eagles make an excellent accessory for any outfit.
The Details
My underdress, or kyrtill, is made using this design (on the 1st page).  The fabric I used is some sort of gabardine and was lovely to work with.  The resulting dress is very comfortable.

My apron dress is made from some blue I-don’t-know-if-it’s-linen-but-it-looks-like-it fabric. And going by the Viking population at Abbey, dark blue is the colour for apron dresses. Of the many apron dress patterns floating around the internet I chose this one for two reasons: I could figure out how it worked (but not how to explain it, so you’re on your own), and it didn’t waste any fabric – which is an important feature of a lot of early garment construction.  The shape of the pattern essentially comes from four rectangles and draping.
Apron dress or hangerock.
I decorated the hem with double herringbone stitch (or possibly a novice’s re-interpretation of herringbone stitch – I’d never done it before and it didn’t turn out quite the way I expected). I was going to look at getting or doing some tablet weaving for the top edge, but now that the outfit is done I think I prefer it as it is.
Both these dresses are put on over my head without any closures. This outfit is actually not too different from what I wear everyday so it seems a bit weird to have it categorised as a costume.

For my brooches I used two medallions that started life as serviette holders from the Vasa museum in Sweden. The medallion design is probably 16th century; a bit too late for Vikings, but they come from the right part of the world.  I plan to replace them at some point, or at least not leave them on the dress, because I like to wear one as a pendant.
I also plan to redo the bead strings. I was able to talk to one of the early-Scandinavia re-enactors at the festival and she said that the beads should be more random as items would only be bought (or found) one at a time and would often have personal significance. At the moment my bead strings have a lot of repeat beads which would be unusual. While this was necessary to get the outfit ready in time to wear on the Sunday, I now plan to collect bits and pieces so I can redo it for the next wearing. 
I did my hair in this style, as found on the Elling woman bog body


Friday, 29 August 2014

Requiescat in pace

I have sent the first assassin outfit off to its new home.
Some of the decorative features I have documented already but since my last post I still had some trimming to do.

The lace on the back and front lace I sewed on by machine but the sleeve and sleevehole braids were attached by hand.
It was tricky sewing the trim onto the sleeve because the sleeve was already sewn up and attached to the garment. I ended up doing the stitching on the ‘right side’ of the sleeve with my left hand and the stitching on the 'wrong side' with my right hand.  The braid has a seperate cord running along each side and I connected the cords as I attached the braid, one side at a time.
There are many rows of straight string trim on the skirts which were all done by machine with a zigzag stitch. I used an invisible zipper foot to guide the string. The scrolling and other fancy bits had to be sewn by hand.
Once all the trimming was done the outfit went together fairly quickly.
I decided to have the doublet and jerkin do up with ties and the front flap closes with clips, which are less historically appropriate.
The hood is lined, which I have never done before but I’m fairly pleased with how it turned out.  I gave the lining some anchoring stitches to the outer fabric at the peak of the hood to stop the layers separating.

To make the sash I sewed three widths of red cotton together with flat felled seams. I hemmed the long sides (by machine, because I had an attack of sanity). The short edge is finished with satin stitch a bit in from the edge, and I frayed the fabric down to the satin stitch to create the fringe.
I was so excited to finish this. While I was making it there were many moments of panic when I became convinced it wouldn’t fit or would look awful but when I finally put them all together it worked. It was a big job and I think it turned out pretty well.


Assassin’s Creed belongs to Ubisoft.

Friday, 8 August 2014

Blue dress

One of my cousins chose for her present a traditional fantasy style dress. To my shock and delight, I found a pattern that matched exactly the designs she had shown me.
Anastasia medieval dress pattern from Laura Marsh designs.
The pattern went together easily, but I would recommend checking the length first as while the pattern ‘as is’ fitted my cousin it was too short on me, although we both wear the same size. I can’t comment on the instructions because I never look at the things.

I found a lovely thick knit (called scuba knit) for the main fabric but the print was harder to find. I wanted a design that would look not out of place on a faux-medieval dress and I needed a fabric that would go with the blue I already had. The fabric I ended up using has a lovely print but it is printed slightly askew to the weave and the fabric was also a lot thinner than my main fabric. Unfortunately, I couldn’t find any other remotely appropriate prints, so I went with the less-than-perfect fabric which does look very nice.  I cut the panel very carefully, not on the fold to better manage the slight skew, and it ended up not causing much of a problem. 
The pattern said to face the neckline, and while I usually eschew facings I thought maybe it would be different for knit fabrics. It wasn’t; the facing didn’t sit right and the lovely thick fabric showed all the stitches needed to hold the facing in place. I expect that will be the last neckline facing I ever do, unless there is a very good reason.When the dress was worn, the centre panel gaped a bit at the neckline. This was fixed by putting a box pleat in the centre of the neckline, which had the happy side effect of forcing the wonky facing to sit right. So in the end, all was well. The lightness of the patterned fabric also proved useful for lining the sleeves, which would have been very heavy if lined with the blue fabric.
I made the each lacing loop separately and hand stitched them into position before sewing the seam to ensure that they stayed in place. They were all placed according to the pattern, but I think if I made this again I would move the back ones upwards a place or two. 

Wednesday, 30 July 2014

"It is such a very Narnian ship"

When I offered my cousins a costume gift at the end of last year the youngest requested Lucy’s outfit from The Voyage of the Dawn Treader (2010) . The outfit consists of a shirt, a tunic and pants. I must confess to having not seen the movie (partly because I'm a book purist, but mostly because I'm too attached to the old BBC series) so I did most of my research at this website.
The tunic and pants are decorated with painted gold curlicues. To get this effect I used stamps and gold fabric paint.
Because I only needed to use small sections of the stamps, I used a brush to get the paint on to the parts of the stamp I wanted to use. The straight lines I did freehand. I am very proud of myself for being satisfied with designs that are not exactly the same as those in the film. They still have the same effect on the outfit – and really no-one would notice unless they were closely comparing the two… which I invite you to do below:
The tunic pattern I drafted from my cousin’s measurements and, to my delight, it didn’t need any fitting alterations. Having now seen the whole outfit on, I do think it would be better if the tunic was a little longer, but it’s too late now and probably I’m the only person who will notice. 
Mum helped me make the pants pattern from a generic pants pattern that she had used for me when I was young. And by ‘mum helped me’ I mean mum did it while I sat nearby and hand-hemmed the tunic. The pants went together easily and fitted properly, so I suppose I‘m a step closer to being not-terrified of making pants.
The pants had to have pleats that could be clipped in place and could open out.
The shirt for this outfit is made completely out of rectangles of fabric – no pattern pieces required.  The collar and cuffs are knife pleated.
The tie is sewn on to the cuff, then loops around to tie on the outside of the cuff.
The collar pleating is decorated with cording on both sides.
I made Dorset buttons which I have never made before. The first one took me a little over an hour, but by the time I finished I had got the process down to 40 minutes.  
The buttons are made with thick sewing thread and a jewellery-making ring.

The collar doesn’t quite sit right, but I’m not sure what I could have done differently. Possibly it would have been better in a less stiff material. Overall, if I made this again there are a few things I would do differently but I am still very happy with how it turned out and so was my cousin.


The Voyage of the Dawn Treader images owned by Disney and Walden Media.

Monday, 16 June 2014

"I applied my heart to know madness and folly"

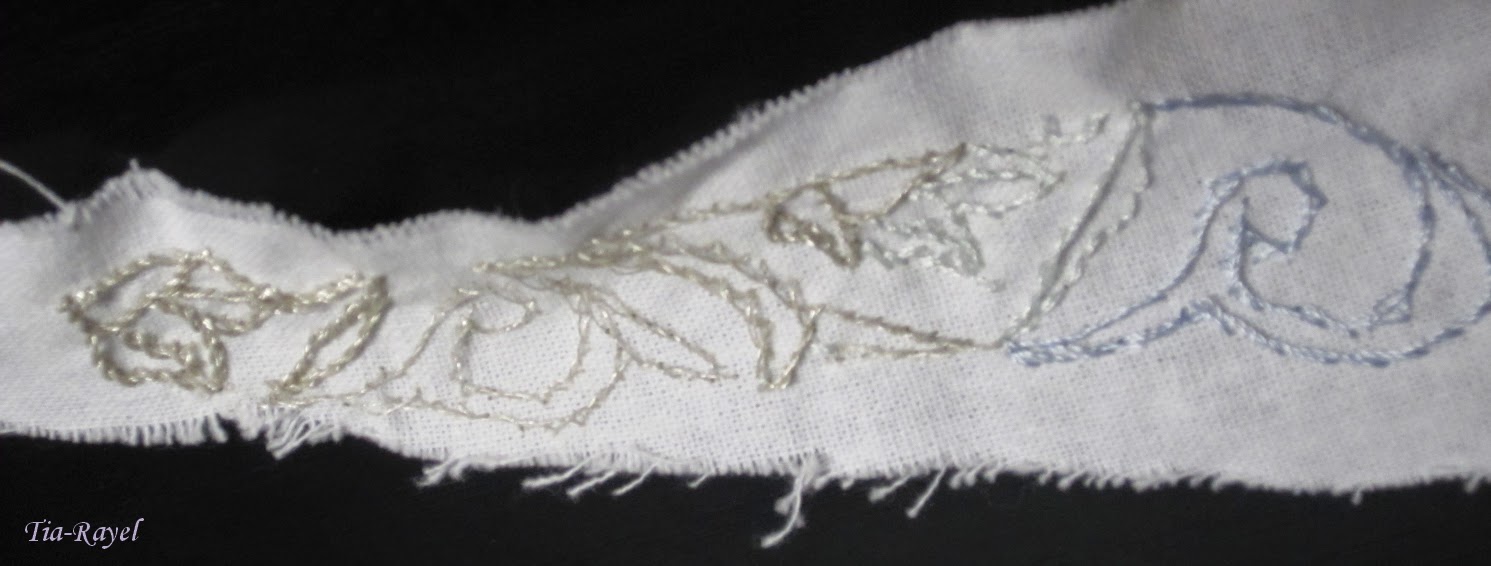
The assassin uniform from Assassin’s Creed II is decorated with phoenix and cabbage motifs on the skirts and intricate metallic borders on the skirts and collar.

I am going to embroider all of these by hand, because I am mad.

Since I am making my outfit in white, not grey, I can’t make the embroidered motifs strand out by having them a lighter colour than the fabric. Instead I will use a shiny thread. I experimented with having the motifs outlined in metallic thread, as seen in this extant garment, but it didn’t have the right look.
source
I made the designs for the motifs in GIMP by tracing over the best reference image I could find. I used a Wacom tablet to do the tracing which was much more efficient than if I had done the same thing by mouse. 
One down, 15 to go. Why do I do this to myself?
The design I am using for my border comes from aBrokenBullet on deviantART (the page has since disappeared). It will be done by couching metal thread. I was originally planning to use stem stitch but the metal thread was too annoying to sew with.
Testing various thread types – final choice not shown, because it only occurred to me afterwards.


Assassin’s Creed belongs to Ubisoft.

Tuesday, 20 May 2014

"We work in the dark to serve the light"


The Assassin’s Creed: Revelations outfit has a number of decorative designs on the fabric. In some images they look like embroidery and in others they don’t, so I have chosen to make the designs by bleaching the fabric.

To get the hood and skirt designs, I traced over reference pictures in GIMP with my drawing tablet. I then manipulated the picture to make the designs symmetrical and flat.

For the doublet I decided to use the assassin logo which is how it appears in game, although there is a different symbol on most of the promotional art. The design I used is readily available online, being printed on t-shirts and the like. (I would like to express my gratitude to Ubisoft for making costumers’ lives easier for once!)

My design patterns for bleaching – not to scale:
Hood Back
Hood Top
Hood Beak
Hood Side
Upper Skirt
Lower Skirt
Once I had my designs, I printed them on overhead transparencies which I then cut into stencils.  For the bleach, I used a Milton bleach tablet moistened in a small amount of water and applied it with a paint brush. I had to be careful with the consistency – I mostly had it at ‘almost a paste’. If the mixture was too liquid the bleach would run under the stencils.
Once I had finished the bleaching I let it sit for 8 or so hours, then rinsed out the fabric.
Out to dry – but not outside because by this time it was 9pm.
And here are the finished pieces:


Assassin’s Creed belongs to Ubisoft.