Tuesday 25 December 2018

2018 Review

My main goal with sewing this year was to work through my fabric stash and backlog of plans rather than add new projects. To that end, I made several items for which I've had designs or fabric lurking around for years.

Real clothes
I did have one final 'proper shop' in Cabramatta's fabric district at the start of the year but it didn't do too much damage to the stash as I turned out two maxi dresses the next weekend. Turns out not buying fabric is a great way to save money that I can then spend on... fabric. I have always loved paisley but even though it is 'in' now, it never seems to be in my colours. I decided to search etsy on a whim one day and came away with busy purple paisley for a maxidress. I’ve got eight of these dresses now, which is probably enough.
In a moment of ‘I need to sew something’ I turned, as I have done before, to the 1940s. A modified Simplicity 1587 resulted in two dresses, one of fabric bought (last year) for the purpose and another from the stash. And then I made a hat to match, because I could.
Turning to my other favourite 20th century decade, the 70s (I hadn’t realised that was a category for ‘favourites’ until someone asked me what mine were, and turns out it is), I made a halter gown with attached cape from Style 1353.
I added a peacock tag to my blog because five garments make a Thing. This year in peacock fashions, I used the bleaching technique I developed for the Assassin's Creed Revelations costume to add a peacock design to a bought tank top.
I finally found fabrics (including a peacock feather print) that would work for a shirt design I drew ages ago. I like how it turned out but haven’t worn it yet as I don’t know what wear it with.
Speaking of styles of clothes I don’t wear, I gave myself a shock at the start of the year by buying, and regularly wearing, ripped black skinny jeans (that actually fit me). I also wanted what would be, I guess, the skirt equivalent but there the shops were less helpful so I made my own heavily-eyeletted black skirt.
Costumes
Also in the interest of Finishing Things, I had leatherworking classes at Birdsall Leather in preparation for finally completing my Assassin's Creed costumes. When I got back from the trip I promptly didn’t do any work on them as the Jane Austen festival was looming.
Mum bought and set up a lovely little leather workstation for me for my birthday. I made a start but had to let the Gamma.Con deadline slip as my health required that I slow down a bit.
My blogging and sewing reduced a bit in the second half of the year, partly for health reasons and partly because I've been putting more of my 'hobby' time into music. I started with a new singing teacher at the beginning of last year and the process of switching from classical to contemporary style has been a (fun and exciting) challenge requiring more practice than I used to do. And then I decided to learn bass guitar because, you know, not enough stuff to do.

For Jafa I made a pink ballgown based on an 1815 fashion plate and a silk 1830s ballgown. Turns out:
a) silk is great,
b) free silk is better (I won a voucher), and
c) not enough silk can, in fact, be a good thing. This design was very much an exercise in limitations causing creativity and the dress is better for it.
Besides the ballgowns, I also made a chemisette, two chemises and a pair of gloves. (The gloves were finished after Jafa and are incredibly dodgy.)
Other people
I was commissioned to make a onesie based on the Amygdala character from the book Hey Warrior. This isn’t the first commission I’ve done but it kind of felt like it was, as I am a bit more socially distant from the commissionee and I had to write an invoice like a Professional Adult.
A lot of the clothes I make I wear to work and one of my colleagues asked if I could give her lessons to make Butterick 6018. I was keen to do this as, while I have done some sewing with people before, since then I have had lessons myself and can show people proper techniques instead of ‘this is what I made up’.

Events
My most significant event this year was Jafa, where I had a great time. I gave Gamma.Con a miss but did make it to Ironfest wearing Eowyn’s riding outfit. As events go, I have done Ironfest now and don’t need to go again.

I finally got to History Alive this year after many years of missing it due to uni exams, starting work and being overseas. I had great fun riding a 'ye olde' bike and doing more regency dancing. My cousin made an 18th century dress in the week leading up to the event, which is super impressive. I wore my 1830s gown and my dad dressed to match in his regency suit.
The saddest event was the closing down of Cardif Collective's haberdashery storefront. It will be missed (although, thanks to the closing down sale, I now have a bolt of ludicrously cheap silk taffeta I can cry into).

I entered the Canberra Show again this year and my 1830s day dress, entered in the miscellaneous category, won champion of the sewing section. Please bring back the historical and costume categories! I got a first with a 1940s dress and second with my 1830s bonnet – my first time competing in millinery.

Speaking of miscellaneous
I made swimming togs last year and actually wore them this year, so I can report that this was a successful venture.

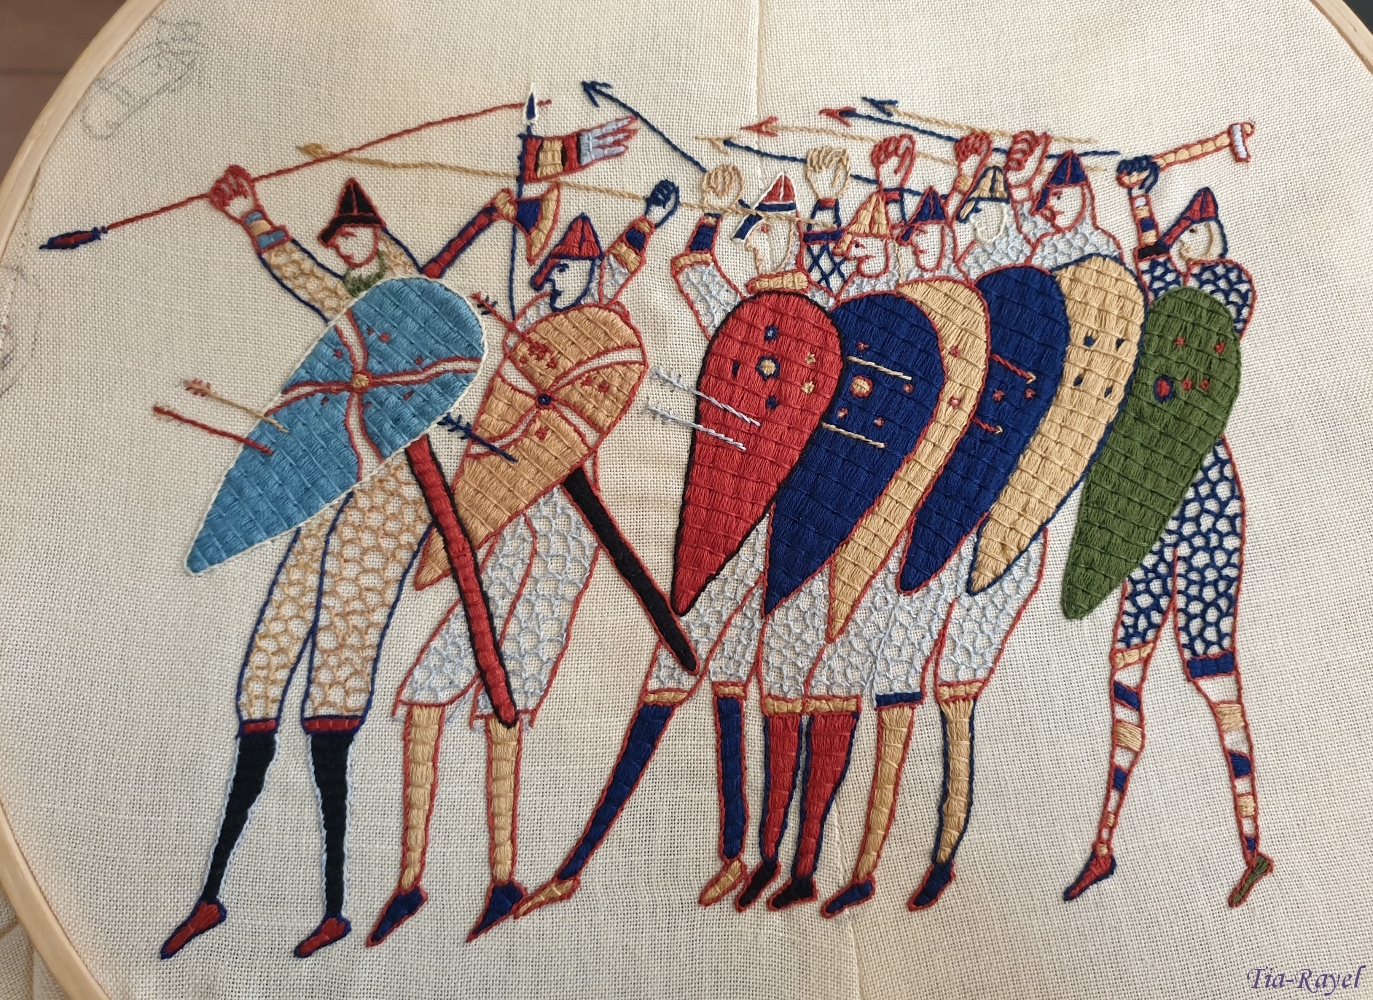
Despite all appearances to the contrary I have not forgotten my Bayeux tapestry dress. I spend 20-30 minutes on it a week (a sermon’s-worth) and have got another two scenes finished.
Plans
I was pretty happy with knocking planned and prepared projects off my to-do list so I think I’ll keep trying to do that next year. I have two significant projects in that category: finishing the Assassins and a ground-up 18th century outfit to be ready for Jafa 2020. I have already started the stays.
I want to make a distinctively 1920s gown as well but I don't have a design as yet. If anyone has advice about how to do a historically accurate flapper look when you have hips please send it my way – I'm struggling.


Now... bring me that horizon!


Saturday 15 December 2018

Grandchild of the 70s

I try not to build up too much of a sewing stash (so say we all) but there are some things you can't leave in the shop. For instance, a number of years ago I picked up this gorgeous 1976 pattern, Style 1353, for 20c at a church fete.
When I was on holidays a while ago (I think it was the New Zealand trip where I bought also this) I bought lots of metres of a lovely turquoise rayon. I think it must be a rayon blend as it does not crumple the way some rayons do.

Looking through the stash I thought this fabric and this pattern would go together perfectly, so I... put them in a project bag and proceeded to ignore it for a year or so. But in September I thought the time had come to actually make this.
Before sewing the dress up, I had to, as usual, deal with the pattern. I have the pattern in its smallest size, which is pretty close to my measurements, but it was still too big. On my mockup I found that one side seam sat in the right place (pretty much the middle of my side) but the other was pulling around to the back. To fix this, I made a separate bodice pattern for each side and did a small bust adjustment on the side where the seam was in the wrong place. There was a lot of room in the back too, so I increased the centre back seam allowance from the top, tapering it to the original width at the base of the waistband. I had to take it in even more on the final dress.
When I made up the bodice I found the front was baggy. To remove the front bagginess, I left the centre front and gathering attached to the waistband and gradually lowered the rest of the front (to about the point where the pin is in the picture) then gradually went back the normal seam allowance just past the side seam.
You might also notice that in the picture there is an awful ridge in the waistband. This was because I was having delusions of neatness and thought I could hide the bodice seam in the lined waistband. I didn’t do that the second time and the ridge disappeared. The bodice is self-lined, so it has the proper drape, and the waistband is lined with a sturdy twill to hold its shape.
So far I have overlooked the most significant change I made, which was redesigning the neckline. Lovely as the pattern looks, a neckline that is open to the waistband is beyond the pale for me, so on my initial muslin I changed the pattern so the bodice pieces met three inches above the waistband. I wasn’t sure how the change of shape would work out given that I was changing a diagonal edge to one that had a right angle and then curved, but it ended up sitting very nicely.
This was my final pattern – you can see several iterations of changes.
However, every time I tried it on I kept thinking “is it too low?” It looked nice but, in the end, I came to the conclusion that I would probably never be comfortable wearing it, so I unpicked the bodice and started a new one. This is where the ‘lots of metres’ of fabric came in handy. I raised the neckline of the pattern by another 1.5 inches. Sadly, the shaping is not quite as smooth as the first version but, on the other hand, I am comfortable wearing the dress so it was the right decision.
On the whole I like this dress a lot. If I were to make it again I would change one more thing, which is to add a centre seam to the cape. The pattern has the cape cut in one piece which sounds like a good idea; however the bias drape means that one side of the cape hangs longer than the other. As much as having a seam would be a shame, I think I’d rather it be symmetrical.
For 70s makeup I didn’t have to ask youtube for advice; instead I asked my mum. The period-correct eyeshadow technique turned out to be “make it all blue” which was slightly concerning when it first went on but looked good with the dress.
The day I went out to photograph this dress was rather windy, meaning the skirt and cape could be 'shown off' to their full extent.

Sunday 30 September 2018

Hattendum

When I made the black version of simplicity 1587 I thought it would go very nicely with a bright red cardigan. I was right, but I thought it wanted another red in the outfit and I took it into my head that I would like to make a co-ordinating pillbox hat. This would have been Thursday. I knew that Saturday would be my last chance for a photoshoot for a while so that was my deadline. I did some googling and appealed to my friend, who owns an original pillbox hat, for some photos and measurements. That evening was spent making paper mockups to get the size right - and hemming the purple dress, because I needed that for Saturday too.
Friday after work I immediately cut the buckram, wadding and fabric so I could be sewing it together while at youth group. The outside of the hat is made from faux suede left over from my Esther costume. As well as matching nicely, I wanted a textured fabric that would have some grip on my slippery hair. The hat is lined with leftover dress fabric because I had that immediately on hand.
For construction I opted to forgo blocking (because time and inexperience) and instead cut a circle (with tabs) and a rectangle and sewed them together. I wired only the lower edge of the hat as the top seemed quite stable without. I’m not certain that the wired edge isn’t slightly smaller than the top. I was eyeballing it and I think it should be just a few millimetres bigger, but I don’t know if the whole hat is too small or just that edge.
I have wadding on both sides of the top piece and a layer around the outside of the crown. Once I had the top and inside of the hat covered I put a band around the outside. I wanted this to have a bit of body from the hat so I wrapped my fabric around another strip of wadding. By this time I was at band practice and sewing every second I wasn’t singing, and then in the carpark while waiting to pick up my mum. Turns out the steering wheel makes a very convenient sewing stand.
I got the hat done just in time. We had been planning on an outdoor shoot but the weather was very overcast and windy. The hat stays on pretty well against a breeze; it wasn’t going to survive that.

Generally I’ve found that if you’re in public in weird clothes with a person toting a camera, people seem to assume you’re meant to be there. At one point another person with a camera joined in and took a photo as well. An elderly gentleman, who told me he owned 400 hats, asked about mine and was disappointed to find it wasn’t made properly. I’ll block the next one, promise.

Monday 24 September 2018

A call to arms

I’ve been wanting to branch out a bit with my 40s sewing and try something other than the pattern I made up at 1 o’clock in the morning three years ago. One of the patterns I picked up is Simplicity 1587, a reprint of a pattern from the 40s. I made a mock-up, probably a year ago now, and started on the adjustments before getting distracted by Butterick 6018.
I pulled out my adjusted 1587 pattern a few weeks ago and made another mock-up. It was almost there. Almost. In the past I would have called it good enough and moved on – after all, arm movement is a luxury, not a necessity – but now it’s time to fix this thing and luxuriate.

My adjustments to this pattern include
  • Square shoulder
  • Broad shoulder
  • My own magic armscye fix
  • Large upper arm
  • Making the 3/4 sleeve a long sleeve
  • Widening the hip yoke
  • Moving the zip from the side seam to the back
  • Removing the peak and gathers from the centre of the skirt waistline, ‘cos, wow, that looked bad! (Going by other blogs this is a popular change.)

Usually I would omit the facing as my experience is that they just cause trouble without any great advantage but this one actually worked nicely. I sewed it down at the shoulder seams and between that and the zip stitching it all stays in place.
The square shoulder adjustment affected both the front and the yoke. Because of the way they fit together I had to do the yoke adjustment on the diagonal which took a bit to get my head around but seems to have worked.
The fix to the square shoulder and my armscye fix counteract each other so in the future I think I will try doing square shoulder only on the top half of the armscye and see if that turns out neater.

The large upper arm adjustment most confuses me as I don’t have a large upper arm relative to me or relative to average. However, without it, I have uncomfortably limited movement, even with all the shoulder adjustments. Or maybe they exacerbate the problem.
I bought a lovely, lovely, lovely fabric from Lincraft. I am indifferent to the print but it feels beautiful, drapes exactly right and doesn’t static the way a lot of these dresses do. So one black dress (very like the original envelope) was my plan. The fabric was a bit jelly-like and inclined to stretch, so to handle that I sewed all the seams with a tearaway backing. I’ve not used this technique before but it was very successful – I had no trouble with unstable seams.
Then my aunt was clearing out her mother’s stash and gave me a collection of fabrics. This included a very nice, light floral and navy print. I think it must be lawn or voile. I did a burn test so I know it is at least partly an artificial fibre which is probably why it doesn’t crumple very much. Unfortunately there was just not quite enough. No amount of creative laying out was going to get me all the pieces from the fabric. So I scoured the stash for something that might match. There was a skerrick left over from my chemise dress petticoat in just the right purple and a similarly light weight. Sadly it doesn’t quite have the same crease-resistant properties as the print but I don’t think I could do any better (especially since I wanted to start cutting Now). On the plus side, the plain colour means the yoke pleating is actually visible and not lost amongst flowers. 
Most of my 40s dresses have the zip starting a couple of inches below the neckline and close with a hook and eye, or have a v-shape in the back. This allows enough opening for the dress to come off over my hips as no-one sells zips long enough for my waist-to-hip ratio. For these dresses I decided to forgo this convenience and started the zip itself at the neckline. By 'decided' I mean I forgot on the first one... but it looked so much neater that I did it on purpose the second time.
Both dresses went together quickly, bar a pause due to running out of thread (both times!) and they fit very comfortably. They have no discomfort in the arm and shoulder region which is a nice change so I think my adjustments were the right thing to do.