Saturday 27 June 2015

Lengthy holidays at the Prince’s hotel*

I have written before about how my bodiced petticoat is better than short stays over a chemise. When I began fitting patterns for my new regency dresses I discovered that the bodiced petticoat had a fault of its own: putting it on for 10 minutes would give me back-ache for the next three hours. It’s been a few years since I made it, and quite a while since I last wore it, so I supposed I may have changed shape a bit.
I decided to (or rather, needed to) make new stays. I decided to try long stays as my experience with other corsets has been that most of the support comes from the hips rather than the shoulder strap. I think the strain on the shoulder straps was the main source of my discomfort in the short stays.
I started with the long stays pattern from Corsets and Crinolines scaled up using my favourite method of a data projector and paper stuck to a wall. From this I produced a mock up but the fit was really odd so I decided to try a different approach.  

On myself I measured the length I wanted the stays to be and I measured my circumference at a lot of different points. I worked out roughly where on me I wanted the edges of the front panel to be and measured that. On my pattern paper I drew two horizontal lines to mark the length of the stays; one marking the top and one the bottom. On the pattern paper I marked the various points at which I had measured the circumference. I then used the Corsets and Crinolines pattern to create the shape of the front pattern piece according to the measurements I had taken. For the other pieces  I shaped the edges by tracing the basic shape from the Corsets and Crinolines pattern but changed the angles and distribution so that, at each of the points on my body that I’d measured, the pattern would have the right circumference measurement to fit me.  

I have no Idea if this is the proper way to fit patterns (or a reliable way) but it worked fairly well on this occasion. (I’m sorry if the explanation above was incomprehensible.) 
The stays are made from two layers of fabric interlined with coutil. I experimented with having a busk but I didn’t like the shape. Instead I put in a small number of cable ties (because I didn’t want to research cording or reed). I did some quilting over the front, vaguely inspired by the design in the book (although my design became significantly simpler as I grew tired of doing quilting). I got my new sewing machine when I was nearly finished this project so I was able to test out the eyelet feature. The eyelets it sews (and especially the hole made by the eyelet punch) are smaller than I am used to, so I had to use bodkins when lacing - but otherwise they’re good. The only problem was the machine doesn’t like non-level surfaces or small spaces, so I had to do the eyelets in the bound strap by hand – which made me even more glad I had a machine to do the rest.  
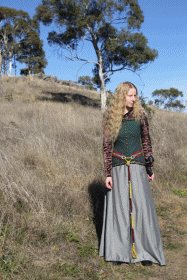
I wore my new stays to JAFA over an old, bulky chemise and discovered a host of problems that need to be addressed. (That’s what a first wearing is really for though, isn’t it?) The worst one was that the front, cable ties included, spent most of the time folded up on itself. I propose to solve this by using a wooden busk (like I should’ve in the first place) and putting in hip gussets. The pattern in Corsets and Crinolines had hip gussets but I took them out, because it was way too big in the hips, and reshaped the side panels. Turns out it does need a bit more give.

I feel like I’m just ‘making stuff up’ as solutions to my problems rather than actually knowing what I’m doing. I’ve made 13 corsets and corset-like garments now and I still can’t seem to get them right. I think I’m missing something fundamental about the mechanics of a corset but I don’t know what. We’ll see if my plans work.
All that said, I am happy with how these stays turned out. They are more comfortable than short stays or the bodiced petticoat and they give me a better regency silhouette. Once adjusted, they will be even better.


*Googling ‘regency stays’ finds you lots of “Regency” hotels; ‘regency stays backache’ finds you the ones with uncomfortable beds.

Sunday 7 June 2015

"Through Rohan over fen and field where the long grass grows"

I've finished my Eowyn costume. It only took a month and a half longer than I wanted it to. (I actually finished it back in March, but wasn’t able to take photos until now.)

This is the original:
I had a couple of significant difficulties when making this that took some time to solve. They are why my quick 'holiday project' ended up taking so long.

The Trim
The trim and the collar caused the main delays. I never did find the right trim. So instead, I painted my own. (“Paint it instead” seems to be a recurring theme around here.) I got mum to draw out the design on a transparency (‘cos she’s much neater than me) then I lit it from below through a glass table to trace it onto the fabric. I actually had to use a clear plastic container on top of the table, because the glass was so textured that it was hard to distinguish the pattern from the shadowy background.

This is the template I used:
This is my painting setup:
I am very happy with the result. It wasn’t too painful to do, nor did it get much messier as I went along as I had been afraid it would. While doing handwork on my costumes I like to watch or listen to something. For this costume my 'topically appropriate' listening was The Tolkien Professor podcasts
The trim in place.
The Collar
After trying many ways of draping the collar, and having none of them work, I gave up. I searched for a pattern to adjust but I couldn't find one. I nearly despaired of finding a way to make this collar work and I had to stop working on the costume because I didn't know what to do. Then, weeks later, a new method occurred to me and it worked! I started with a long rectangle and cut the back neckline shape cut into it at the centre. Then I folded it around to the front. To get the shoulder shape there is a shoulder seam that forms two pleats that curve the collar over the top of the arm. 

It looks like this on the inside and outside:
I fiddled with the fronts until they had the three-pleat look of the original.
The Belt
The belt wasn't so much a delay-making problem but is something I want to fix - when I work out what to do with it. At present it doesn't really have a doing-up mechanism.

My belt is made from burgundy fabric, brocade trim, wool, painted beads and earring parts. I couldn’t find anything the right shape for the belt loops but the earring parts I found had flowers very like the design associated with Eowyn, as seen on her necklace, so I thought they’d do.

What I didn’t realise was that I would actually need three as there are two loops on the belt and also a third loop on the woollen cord hanging from the belt. I couldn’t find a third loop of the same kind, so I’m making do.
The Buttons
The buttons I got at the closing down sale of our local patchwork shop which made this feature more economical than it would have been otherwise. They are purely decorative as the outfit actually closes with snaps - but it probably won’t for much longer since they keep popping apart while I’m trying to do them all up and they aren’t technologically appropriate for Rohan. I’m just not sure what I can replace them with.
Pictures
Yesterday Mum and I went to a nearby hill to do a photoshoot. My Dad had given me a replica of Eowyn’s sword for my birthday to go with this costume, so I had fun with that.


The Lord of the Rings images belong to New Line Cinema.